

Using Layout protocol to align explicitly positioned views in SwiftUI
We've just released a big update to our app Exsto, and one of the main additions was an interactive tutorial for new users. The tutorial helps users make their first strokes to start creating their own artworks. For this tutorial we needed to add a moving label that changes its position based on where the next stroke should start. To be able to animate the label as it changes its location, we added it in an overlay over the entire screen.
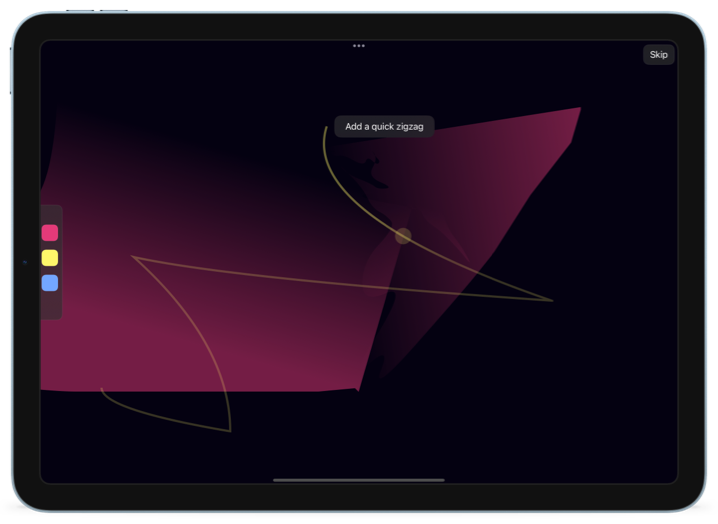
The position() modifier in SwiftUI lets us put a view inside its parent frame by setting the views center to a given (x, y) coordinate. However, in our use case, we don't want our label to be centered on its anchor and to obscure the view it's labeling, so we need it to be right or left aligned to the anchor point.
A common workaround in iOS 15 and earlier is to overlay the presented view with a GeometryReader that measures its size and adjusts the offset accordingly. But reading these values is not ideal as it creates a cycle where the offset is updated only after the size is read. It results in inconsistent animations, in particular if we are also animating the label's text and size while moving it to the next control.
The new Layout protocol in iOS 16 lets us place views explicitly, and unlike the position() modifier, we can specify an anchor point when we call the place() method in placeSubviews().
We have different ways to use the Layout protocol. One advanced option is to have each overlay provide a layout value to a common layout that places multiple views. But in our case, we only have one annotation, so we used a simpler option where each annotation has its own layout.
# Building the layout
First we need to build a simple AnchoredPosition layout.
struct AnchoredPosition: Layout {
    let location: CGPoint
    let anchor: UnitPoint

    func sizeThatFits(
        proposal: ProposedViewSize,
        subviews: Subviews,
        cache: inout ()
    ) -> CGSize {
        return proposal.replacingUnspecifiedDimensions()
    }

    func placeSubviews(
        in bounds: CGRect,
        proposal: ProposedViewSize,
        subviews: Subviews,
        cache: inout ()
    ) {
        let locationInBounds = CGPoint(
            x: location.x + bounds.origin.x,
            y: location.y + bounds.origin.y
        )

        for view in subviews {
            view.place(
                at: locationInBounds,
                anchor: anchor,
                proposal: proposal
            )
        }
    }
}
Now AnchoredPosition can be used to replace the position() modifier.
AnchoredPosition(location: anchorPoint, anchor: .leading) {
    OnBoardingCalloutLabel()
}


Level up your Swift skills!$35
100+ tips to take your Swift code to the next level
Swift Gems
- Advanced Swift techniques for experienced developers bypassing basic tutorials
- Curated, actionable tips ready for immediate integration into any Swift project
- Strategies to improve code quality, structure, and performance across all platforms
Level up your Swift skills!
100+ tips to take your Swift code to the next level
Swift Gems
# Dynamically adjusting for available space
The Layout protocol also allows us to check the available space and the space required by the view. With the space needed we can dynamically change the anchor, for example, from leading to trailing.
For the leading or trailing case, we can modify the placeSubviews() method.
func placeSubviews(
    in bounds: CGRect,
    proposal: ProposedViewSize,
    subviews: Subviews,
    cache: inout ()
) {
    let locationInBounds = CGPoint(
        x: location.x + bounds.origin.x,
        y: location.y + bounds.origin.y
    )

    for view in subviews {
        if anchor == .leading,
            location.x + view.sizeThatFits(proposal).width > bounds.width {
            view.place(
                at: locationInBounds,
                anchor: .trailing,
                proposal: proposal
            )
        } else {
            view.place(
                at: locationInBounds,
                anchor: anchor,
                proposal: proposal
            )
        }
    }
}
We can also pass the remaining size to the view when we place it, so that the view can adjust its size accordingly. For that we need a new method remainingProposedSize() that returns the new proposed size.
func remainingProposedSize(
        in bounds: CGRect,
        for anchor: UnitPoint
) -> ProposedViewSize {
    var newProposal = ProposedViewSize(
        width: bounds.width,
        height: bounds.height
    )

    let leadingWidth = bounds.width - location.x
    let topHeight = bounds.height - location.y

    switch anchor {
    case .bottom:
        newProposal.height = location.y
    case .bottomLeading:
        newProposal.height = location.y
        newProposal.width = leadingWidth
    case .bottomTrailing:
        newProposal.height = location.y
        newProposal.width = location.x
    case .center, .zero:
        break
    case .leading:
        newProposal.width = leadingWidth
    case .top:
        newProposal.height = topHeight
    case .topLeading:
        newProposal.height = topHeight
        newProposal.width = leadingWidth
    case .topTrailing:
        newProposal.height = topHeight
        newProposal.width = location.x
    case .trailing:
        newProposal.width = location.y
    default:
        break
    }
    return newProposal
}
We start by using the new remainingProposedSize() method to check if a given anchor is feasible or if we need to switch to an alternative.
func alternativeAnchor(
    for view: LayoutSubview,
    in bounds: CGRect
) -> UnitPoint? {

    let viewSize = view.sizeThatFits(
        remainingProposedSize(in: bounds, for: self.anchor)
    )

    switch anchor {
    case .center, .zero:
        return nil
    case .top:
        if viewSize.height + location.y > bounds.height {
            return .bottom
        }
    case .bottom:
        if viewSize.height > location.y {
            return .top
        }
    case .bottomLeading:
        if viewSize.width + location.x > bounds.width {
            return .bottomTrailing
        }
    case .bottomTrailing:
        if viewSize.width > location.x {
            return .bottomLeading
        }
    case .topLeading:
        if viewSize.width + location.x > bounds.width {
            return .topTrailing
        }
    case .topTrailing:
        if viewSize.width > location.x {
            return .topLeading
        }
    case .leading:
        if viewSize.width + location.x > bounds.width {
            return .trailing
        }
    case .trailing:
        if viewSize.width > location.x {
            return .leading
        }
    default:
        return nil
    }
    return nil
}
Then we can use alternativeAnchor() and remainingProposedSize() in our placeSubviews() method.
func placeSubviews(
    in bounds: CGRect,
    proposal: ProposedViewSize,
    subviews: Subviews,
    cache: inout ()
) {

    let locationInBounds = CGPoint(
        x: location.x + bounds.origin.x,
        y: location.y + bounds.origin.y
    )

    for view in subviews {
        if let alternativeAnchor = alternativeAnchor(
            for: view,
            in: bounds
        ) {
            view.place(
                at: locationInBounds,
                anchor: alternativeAnchor,
                proposal: remainingProposedSize(
                    in: bounds,
                    for: alternativeAnchor
                )
            )
        } else {
            view.place(
                at: locationInBounds,
                anchor: anchor,
                proposal: remainingProposedSize(
                    in: bounds,
                    for: anchor
                )
            )
        }
    }
}
There are endless further improvements we could make, such as detecting if both leading and trailing are impossible and falling back to top or bottom alignment.
You can find the code in a sample project on GitHub.
Enhance older apps with SwiftUI!$40
A detailed guide on gradually adopting SwiftUI in UIKit projects
Updated for iOS 18 and Xcode 16!
Integrating SwiftUI into UIKit Apps
- Upgrade your apps with new features like Swift Charts and Widgets
- Support older iOS versions with effective backward-compatible strategies
- Seamlessly bridge state and data between UIKit and SwiftUI using the latest APIs
Enhance older apps with SwiftUI!
A detailed guide on gradually adopting SwiftUI in UIKit projects
Integrating SwiftUI
into UIKit Apps
Updated for iOS 18 and Xcode 16!