

Custom environment values in SwiftUI
SwiftUI environment provides a way to pass values through the view hierarchy without manually forwarding them. While SwiftUI includes built-in environment values for system settings, we can also define custom environment values to share app-specific data. This allows us to store and propagate values such as user preferences, feature flags, or custom styling configurations in a structured and reusable way.
To use a custom environment value, we need to define it, provide a default value, and inject it into the environment so that any child view can access it.
# Defining custom environment values before Xcode 16
Before Xcode 16, defining a custom environment value required writing a fair amount of boilerplate. We had to create a key conforming to EnvironmentKey, provide a default value, and extend EnvironmentValues to add a computed property for accessing and modifying the value.
For example, to define a custom environment value for storing a user's preferred color, we had to write the following code:
private struct FavoriteColorKey: EnvironmentKey {
    static let defaultValue: Color = .blue
}

extension EnvironmentValues {
    var favoriteColor: Color {
        get { self[FavoriteColorKey.self] }
        set { self[FavoriteColorKey.self] = newValue }
    }
}
This setup allowed us to store and retrieve the value through the environment, but it required multiple declarations for a single property.
# Defining custom environment values with the @Entry macro
With the introduction of the @Entry macro in Xcode 16, manually defining environment keys is no longer necessary. Now, we can declare an environment value directly inside the EnvironmentValues struct and assign it a default value at the same time.
extension EnvironmentValues {
    @Entry var favoriteColor: Color = .blue
}
The @Entry macro automatically generates the necessary environment key and computed property, eliminating the need for additional boilerplate. If you're curious, you can expand the macro by right-clicking on @Entry in Xcode and selecting "Expand Macro" to view the generated code.
Even though the @Entry macro is new in Xcode 16, it works with older iOS and macOS versions as long as the app is built with Xcode 16. This means we can use it while supporting iOS 13 and later, as well as macOS 10.15 and later. There’s no need to drop compatibility with older systems to take advantage of this improved syntax.
# Setting and reading custom environment values
To pass a value into the environment, we can use the environment(_:_:) modifier, which sets the environment value for a specific key path.
For built-in values, SwiftUI provides dedicated view modifiers that encapsulate this logic, and the same approach is recommended when defining custom values. To achieve this, we can extend View and create a method that writes the value to the environment.
extension View {
    func favoriteColor(_ color: Color) -> some View {
        environment(\.favoriteColor, color)
    }
}
By defining a dedicated modifier, we make setting the value more intuitive and consistent with SwiftUI’s built-in environment APIs.
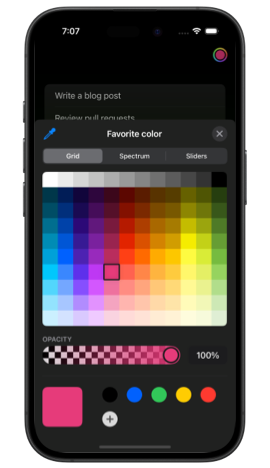
In the following example, we let the user select their favorite color using a ColorPicker. The selected color is then stored in a @State property and injected into the environment using our custom favoriteColor(_:) modifier, making it available to all child views.
struct ContentView: View {
    @State private var favoriteColor: Color = .blue

    var body: some View {
        NavigationStack {
            TodoList()
                .toolbar {
                    ColorPicker(
                        "Favorite color",
                        selection: $favoriteColor
                    )
                    .labelsHidden()
                }
        }
        .favoriteColor(favoriteColor)
    }
}

Once the value is set in the environment, any child view, no matter how deeply nested, can read it using the @Environment property wrapper.
For example, suppose we have a TaskCheckmark view that displays a checkmark icon next to a completed task in the TodoList. Instead of passing the color manually from ContentView through TodoList and its subviews, TaskCheckmark can directly retrieve favoriteColor from the environment and apply it to the checkmark’s foreground style.
struct TaskCheckmark: View {
    @Environment(\.favoriteColor)
    private var favoriteColor

    var body: some View {
        Image(systemName: "checkmark")
            .foregroundStyle(favoriteColor)
    }
}

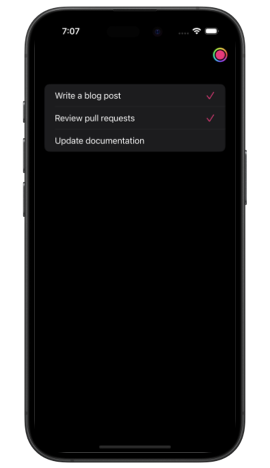
Because SwiftUI’s environment propagates changes, any updates to favoriteColor in ContentView will instantly reflect in all views that use it. If the user selects a new color, the checkmark (and any other dependent views) will update automatically without requiring any additional code.
You can find the sample code for this post on GitHub.
If you want to build a strong foundation in SwiftUI, my new book SwiftUI Fundamentals takes a deep dive into the framework’s core principles and APIs to help you understand how it works under the hood and how to use it effectively in your projects.
For more resources on Swift and SwiftUI, check out my other books and book bundles.


Deepen your understanding of SwiftUI!$35
The essential guide to SwiftUI core concepts and APIs
SwiftUI Fundamentals
- Explore the key APIs and design patterns that form the foundation of SwiftUI
- Develop a deep, practical understanding of how SwiftUI works under the hood
- Learn from a former Apple engineer who worked on widely used SwiftUI APIs
Deepen your understanding of SwiftUI!
The essential guide to SwiftUI core concepts and APIs
SwiftUI Fundamentals