Preview files with QuickLook in SwiftUI
With QuickLook framework we can let users preview various file formats such as Images, Live Photos, PDFs etc. In this article we will look at how we can use QuickLook's QLPreviewController in SwiftUI with the help of UIViewControllerRepresentable protocol.
The code for this article was tested in Xcode 11.6 with iOS 13.6 and Xcode 12 beta 4 with iOS 14 beta 4. The sample project is available on GitHub.
# QLPreviewController with UIViewControllerRepresentable
To use QLPreviewController in SwiftUI we have to wrap it in UIViewControllerRepresentable. We'll create a PreviewController struct with url property that is the url to the file to preview. makeUIViewController(context:) method will return a QLPreviewController and updateUIViewController(_:context:) can be left empty for this example.
struct PreviewController: UIViewControllerRepresentable {
    let url: URL

    func makeUIViewController(context: Context) -> QLPreviewController {
        let controller = QLPreviewController()
        return controller
    }

    func updateUIViewController(
        _ uiViewController: QLPreviewController, context: Context) {}
}
To be able to present a file, QLPreviewController requires a data source. We can define a Coordinator that will act as QLPreviewControllerDataSource. In our example we will only preview one file, so we return 1 in numberOfPreviewItems(in:) method, but you can adjust it in your project. previewController(_:previewItemAt:) has to return an object conforming to QLPreviewItem protocol. We can either define our own object or just return a NSURL which already conforms to QLPreviewItem.
class Coordinator: QLPreviewControllerDataSource {
    let parent: PreviewController

    init(parent: PreviewController) {
        self.parent = parent
    }

    func numberOfPreviewItems(
        in controller: QLPreviewController
    ) -> Int {
        return 1
    }

    func previewController(
        _ controller: QLPreviewController,
        previewItemAt index: Int
    ) -> QLPreviewItem {
        return parent.url as NSURL
    }

}
Then we'll add makeCoordinator() method that returns our Coordinator and assign the dataSource property of QLPreviewController in makeUIViewController(context:) before returning it.
struct PreviewController: UIViewControllerRepresentable {
    let url: URL

    func makeUIViewController(context: Context) -> QLPreviewController {
        let controller = QLPreviewController()
        controller.dataSource = context.coordinator
        return controller
    }

    func makeCoordinator() -> Coordinator {
        return Coordinator(parent: self)
    }

    func updateUIViewController(
        _ uiViewController: QLPreviewController, context: Context) {}

    class Coordinator: QLPreviewControllerDataSource { ... }
}
You can get the code for PreviewController on GitHub.
# Present PreviewController
To test our PreviewController we will create a simple SwiftUI view that will present a PDF file from our project. We will present the preview in a modal sheet.
struct ContentView: View {
    // force unwrap the optional,
    // because the test file has to be in the bundle
    let fileUrl = Bundle.main.url(
        forResource: "LoremIpsum", withExtension: "pdf"
    )!

    @State private var showingPreview = false

    var body: some View {
        Button("Preview File") {
            self.showingPreview = true
        }
        .sheet(isPresented: $showingPreview) {
            PreviewController(url: self.fileUrl)
        }
    }
}
Note that currently QLPreviewController used with UIViewControllerRepresentable in SwiftUI doesn't have the file title and buttons on top, like it has when presented in a UIKit app.
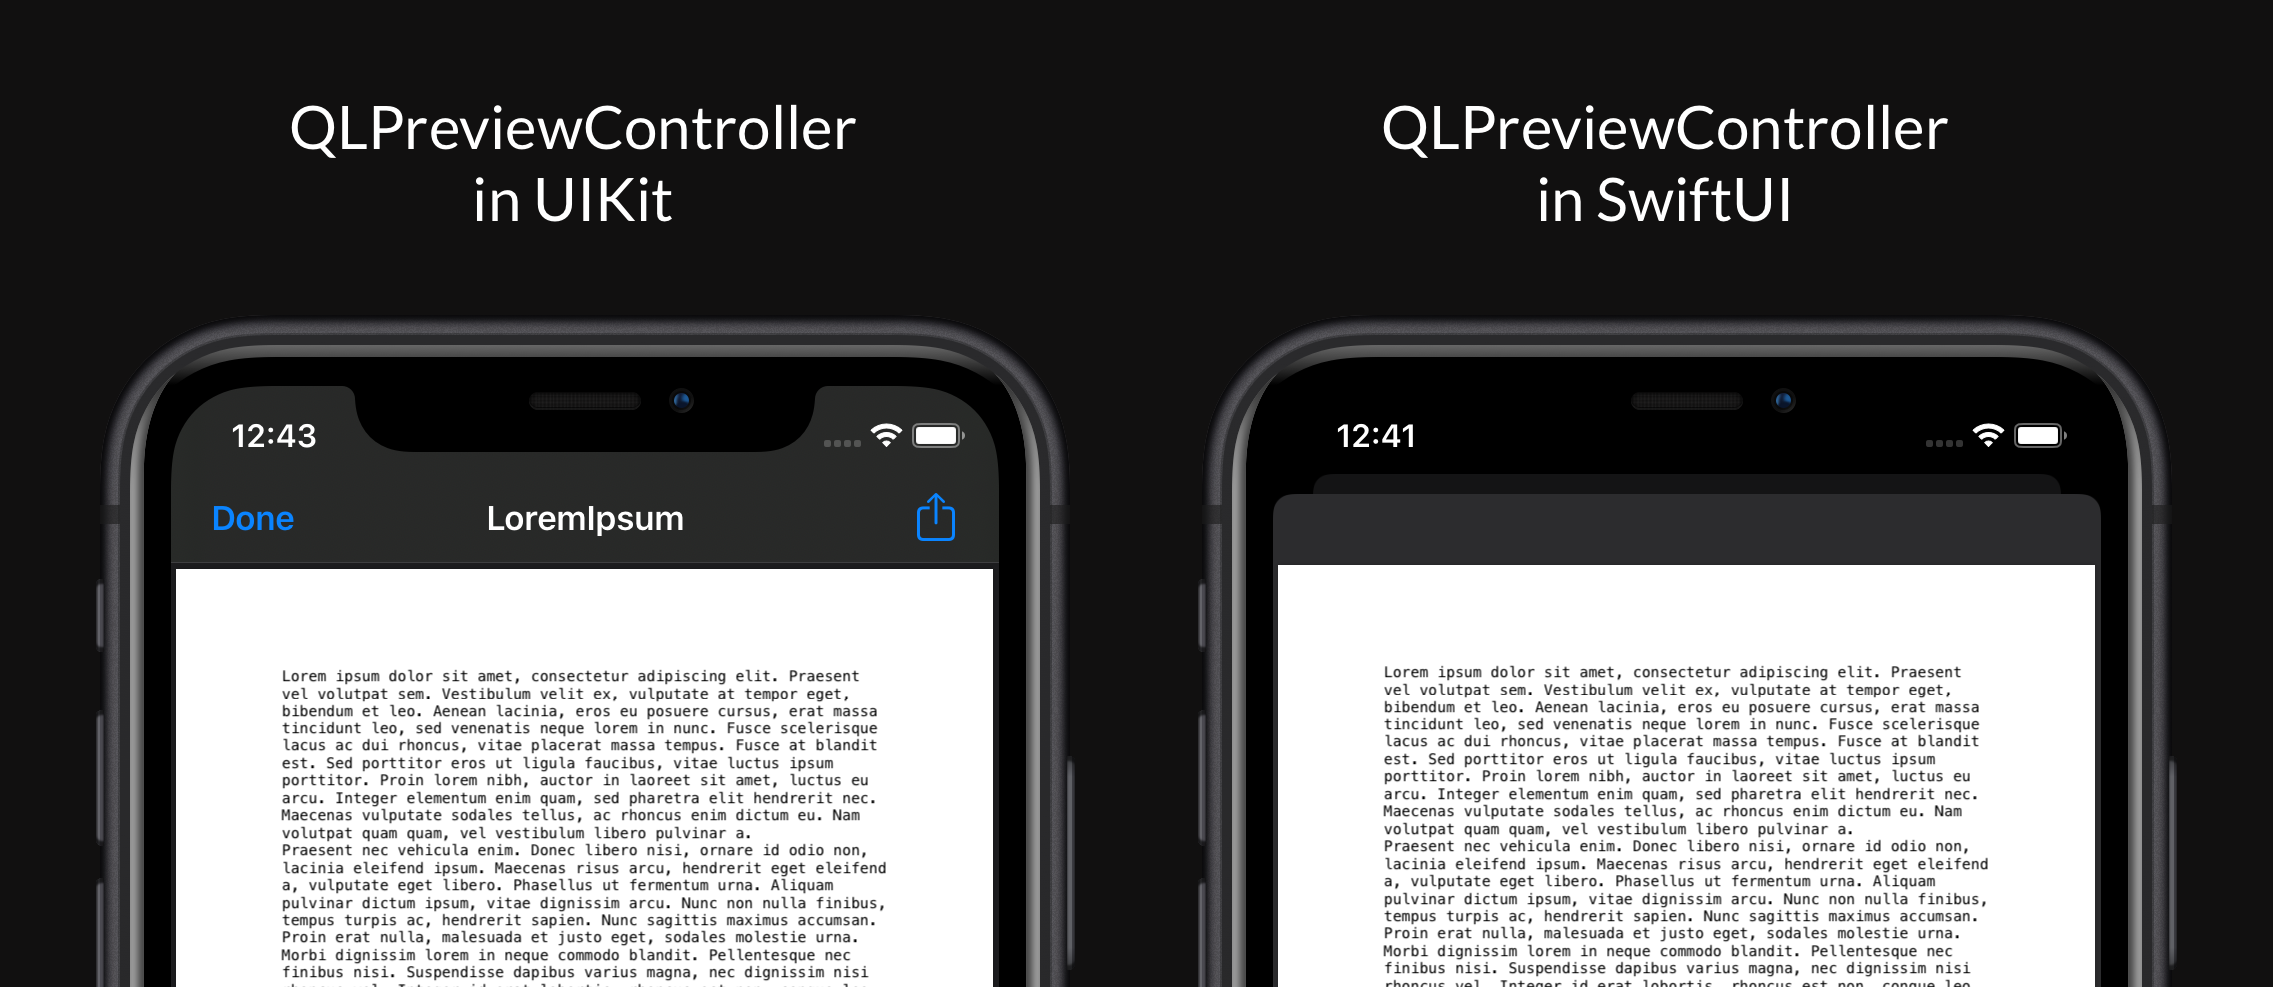
To allow the user to dismiss the preview, we'll have to add our own Done button.
struct ContentView: View {
    ...

    @State private var showingPreview = false

    var body: some View {
        Button("Preview File") {
            self.showingPreview = true
        }
        .sheet(isPresented: $showingPreview) {
            VStack(spacing: 0) {
                HStack {
                    Button("Done") {
                        self.showingPreview = false
                    }
                    Spacer()
                }
                .padding()

                PreviewController(url: self.fileUrl)
            }
        }
    }
}
The code for ContentView is available on GitHub.
# Embed QLPreviewController in UINavigationController
If you would like to have the default Share button and a title on top of QLPreviewController like in UIKit you can embed it inside a UINavigationController. You will then get the Share button and the title, but the Done button still isn't there on iOS 13.6 and iOS 14 beta 4.
func makeUIViewController(context: Context) -> UINavigationController {
    let controller = QLPreviewController()
    controller.dataSource = context.coordinator

    let navigationController = UINavigationController(rootViewController: controller)
    return navigationController
}
We'll have to add the Done button manually to the navigationItem and add dismiss() method to our Coordinator that will get called when the button is tapped.
struct PreviewController: UIViewControllerRepresentable {
    ...

    func makeUIViewController(context: Context) -> UINavigationController {
        let controller = QLPreviewController()
        controller.dataSource = context.coordinator
        controller.navigationItem.leftBarButtonItem = UIBarButtonItem(
            barButtonSystemItem: .done, target: context.coordinator,
            action: #selector(context.coordinator.dismiss)
        )

        let navigationController = UINavigationController(
            rootViewController: controller
        )
        return navigationController
    }

    class Coordinator: QLPreviewControllerDataSource {
        let parent: PreviewController
        ...

        @objc func dismiss() {}
    }
}
To allow dismiss() method to dismiss the preview presented inside a modal sheet, we'll pass the binding that controls the sheet presentation to PreviewController and set it to false when Done button is tapped.
struct PreviewController: UIViewControllerRepresentable {
    let url: URL
    @Binding var isPresented: Bool
    ...

    class Coordinator: QLPreviewControllerDataSource {
        let parent: PreviewController
        ...

        @objc func dismiss() {
            parent.isPresented = false
        }
    }
}

struct ContentView: View {
    let fileUrl = Bundle.main.url(
        forResource: "LoremIpsum",
        withExtension: "pdf"
    )!

    @State private var showingPreview = false

    var body: some View {
        Button("Preview File") {
            self.showingPreview = true
        }
        .sheet(isPresented: $showingPreview) {
            PreviewController(
                url: self.fileUrl,
                isPresented: self.$showingPreview
            )
        }
    }
}
You can get the project with this alternative solution with UINavigationController from our GitHub as well.


