

WebSocket demo server in Node.js
In this article, we'll walk through building a demo Node.js server that streams example stock data over WebSocket. If you're new to WebSockets, you can refer to the WebSocket Protocol specification for more details.
The complete code for this project is available in the Stocks-WebSocket-Demo-Server repository on GitHub.
# Setting up the project
First, choose a location for your project and navigate to it in the command line. Then, create a new folder for the project and initialize a package.json file. You can either provide custom responses during initialization or press Enter to accept the default values.
mkdir StocksWebsocketDemoServer && cd StocksWebsocketDemoServer
npm init
Next, open the project folder in your preferred code editor.
Initially, the package.json file should look similar to this:
{
  "name": "stockswebsocketdemoserver",
  "version": "1.0.0",
  "description": "This is a demo server that serves example stocks data over WebSocket.",
  "main": "server.js",
  "scripts": {
    "test": "echo \"Error: no test specified\" && exit 1"
  },
  "author": "NATALIA PANFEROVA",
  "license": "MIT"
}
# Creating a WebSocket server
We'll use the ws library to implement our WebSocket server.
First, install ws it as a dependency.
npm install ws --save
Next, create a server.js file and set up a WebSocket server that listens on port 8080.
let WebSocketServer = require('ws').Server

let wss = new WebSocketServer({port: 8080})
console.log("WebSocket server is listening on port 8080.")
# Generating example stock data
For demonstration purposes, we'll generate fake stock data using the fake-stock-market-generator library.
First, install the package.
npm install fake-stock-market-generator --save
Now, create a script called generateStocks.js to generate an array of stock objects and save them to a file.
let fakestockmarketgenerator = require('fake-stock-market-generator')
let fs = require("fs")

let stocks = [...Array(20).keys()].map(i => {
    return fakestockmarketgenerator.generateStockData(10)
})
fs.writeFileSync('stocks.json', JSON.stringify(stocks, null, 4));
Add this script to the scripts section of package.json.
"scripts": {
    "generate-stocks-data": "node generateStocks.js"
}
Generate the stock data by running the script from the command line. This will create a stocks.json file containing an array of stock objects.
npm run generate-stocks-data
Next, modify server.js to read and store this data.
let WebSocketServer = require('ws').Server
let fs = require("fs")

let stocks
try {
    stocks = JSON.parse(fs.readFileSync("stocks.json"))
    console.log("Successfully loaded stocks data.")

} catch {
    throw Error("Could not load stocks data.")
}
let stockSymbols = stocks.map(stock => stock.symbol)
console.log(`Supported stock symbols: ${stockSymbols}`)

let wss = new WebSocketServer({port: 8080})
console.log("WebSocket server is listening on port 8080.")
# Designing and testing WebSocket API
Clients will interact with our server by sending JSON messages. They can subscribe to stock updates and receive real-time data.
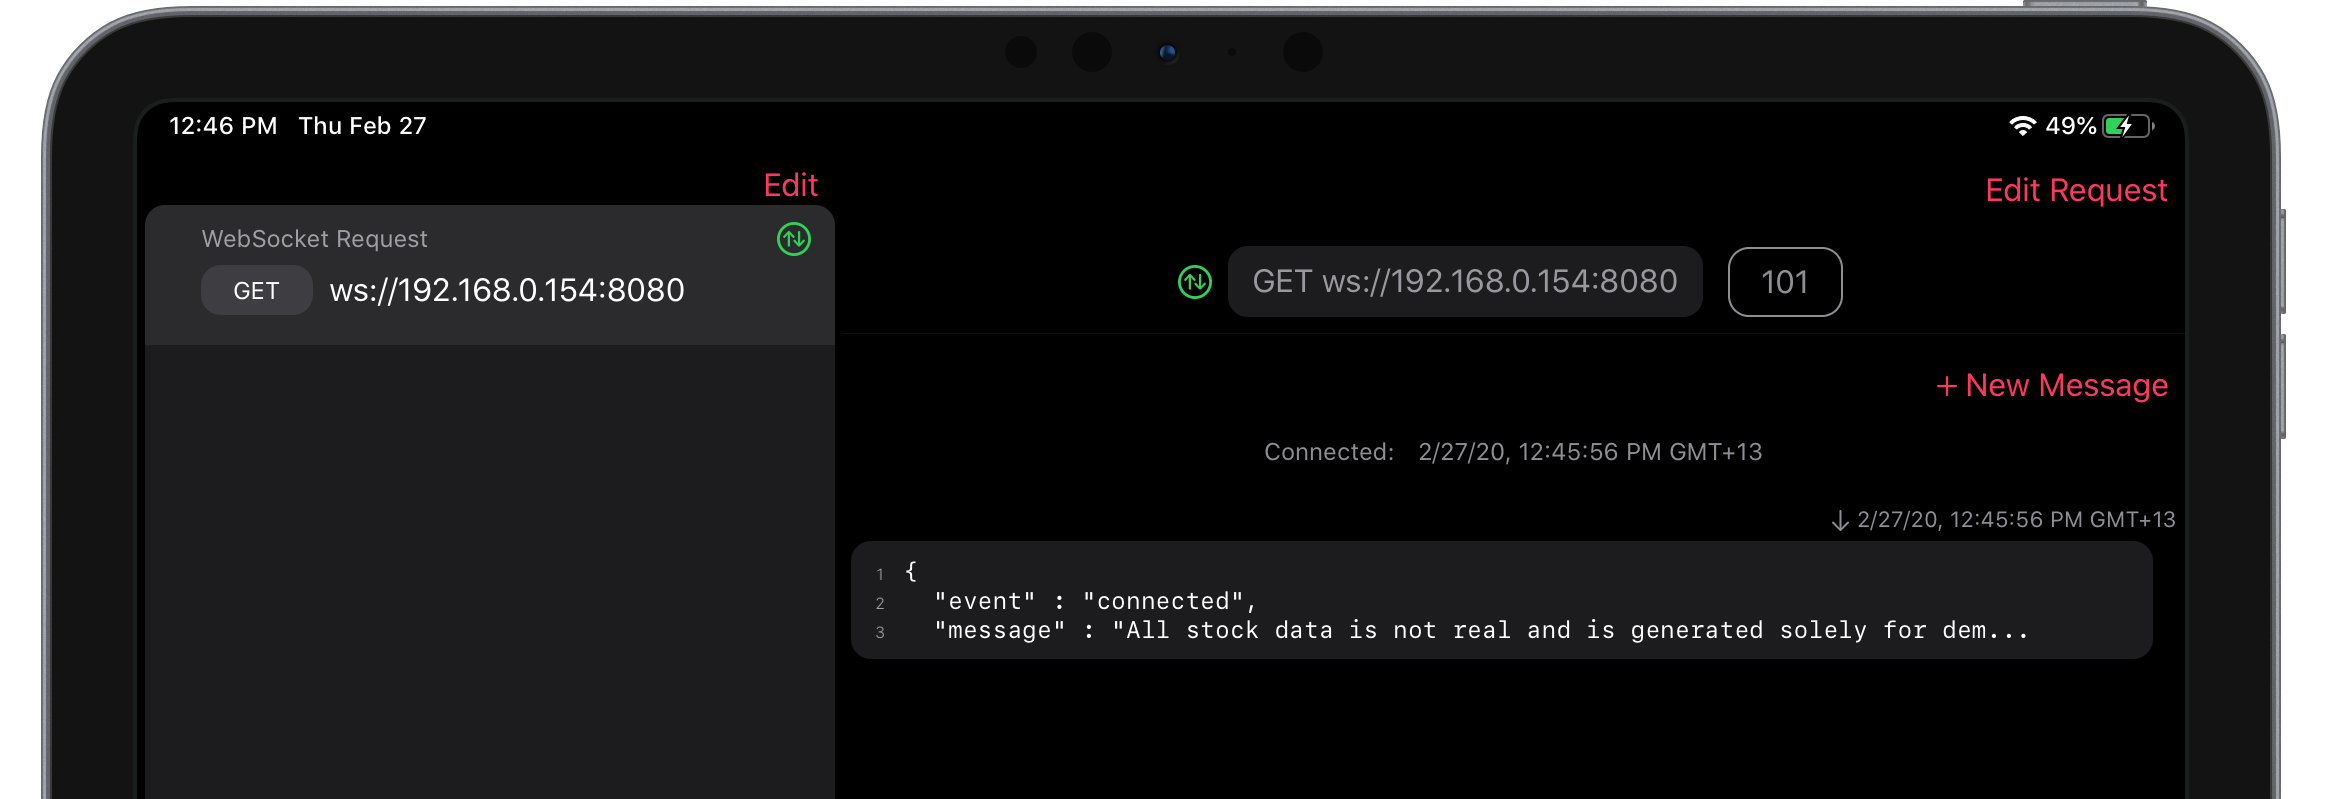
You can use any WebSocket client to test the server. The screenshots in this post are showing "Cleora - HTTP & WebSocket Client".
# Establishing a connection
When a new client connects, the server will send a message listing available stock symbols.
let getConnectedEvent = () => {
    let event = {
        event: "connected",
        supportedSymbols: stockSymbols,
        message: "All stocks data is not real and is generated solely for demo purposes."
    }
    return JSON.stringify(event)
}

wss.on('connection', (ws) => {
    ws.send(getConnectedEvent())
})
To try it out, start the server in the command line.
node server.js
In your WebSocket client app, create a new WebSocket request, enter the IP address and port of your local server in the URL field, and open a connection.

If successful, you'll receive the connected message.
# Handling client messages
The server will process two types of messages: subscribe (to receive stock updates) and unsubscribe (to stop receiving updates). If a message is invalid, the server will return an error.
wss.on('connection', (ws) => {
    ws.send(getConnectedEvent())

    let connectionInfo = {
        stocksToWatch: []
    }


    ws.on('message', (message) => {
        connectionInfo.isActive = true

        if (message.length > 300) {
            ws.send(getErrorEvent("message too long"))
            return
        }

        let parsedMessage
        try {
            parsedMessage = JSON.parse(message)
        } catch {
            ws.send(getErrorEvent("invalid message"))
            return
        }

        if (parsedMessage.event === "subscribe") {
            handleSubscribe(ws, parsedMessage, connectionInfo)
        } else if (parsedMessage.event === "unsubscribe") {
            handleUnsubscribe(ws, parsedMessage, connectionInfo)
        }
    })
})
# Sending stock updates
The server will send updates every 10 seconds to clients watching at least one stock.
let connectionInfo = {
    stocksToWatch: [],
    stocksUpdateCount: 0
}

ws.stocksInterval = setInterval(() => {
    if (connectionInfo.stocksToWatch.length > 0) {
        ws.send(getStocksUpdateEvent(connectionInfo))
        connectionInfo.stocksUpdateCount += 1
    }
}, 10000)

ws.on('close', () => {
    clearInterval(ws.stocksInterval)
})
To test the updates subscribe to IET and ZHT stocks by sending the following message:
{
  "event": "subscribe",
  "stocks": ["IET", "ZHT"]
}
You should see the updates for the stocks coming from the server every 10 seconds.
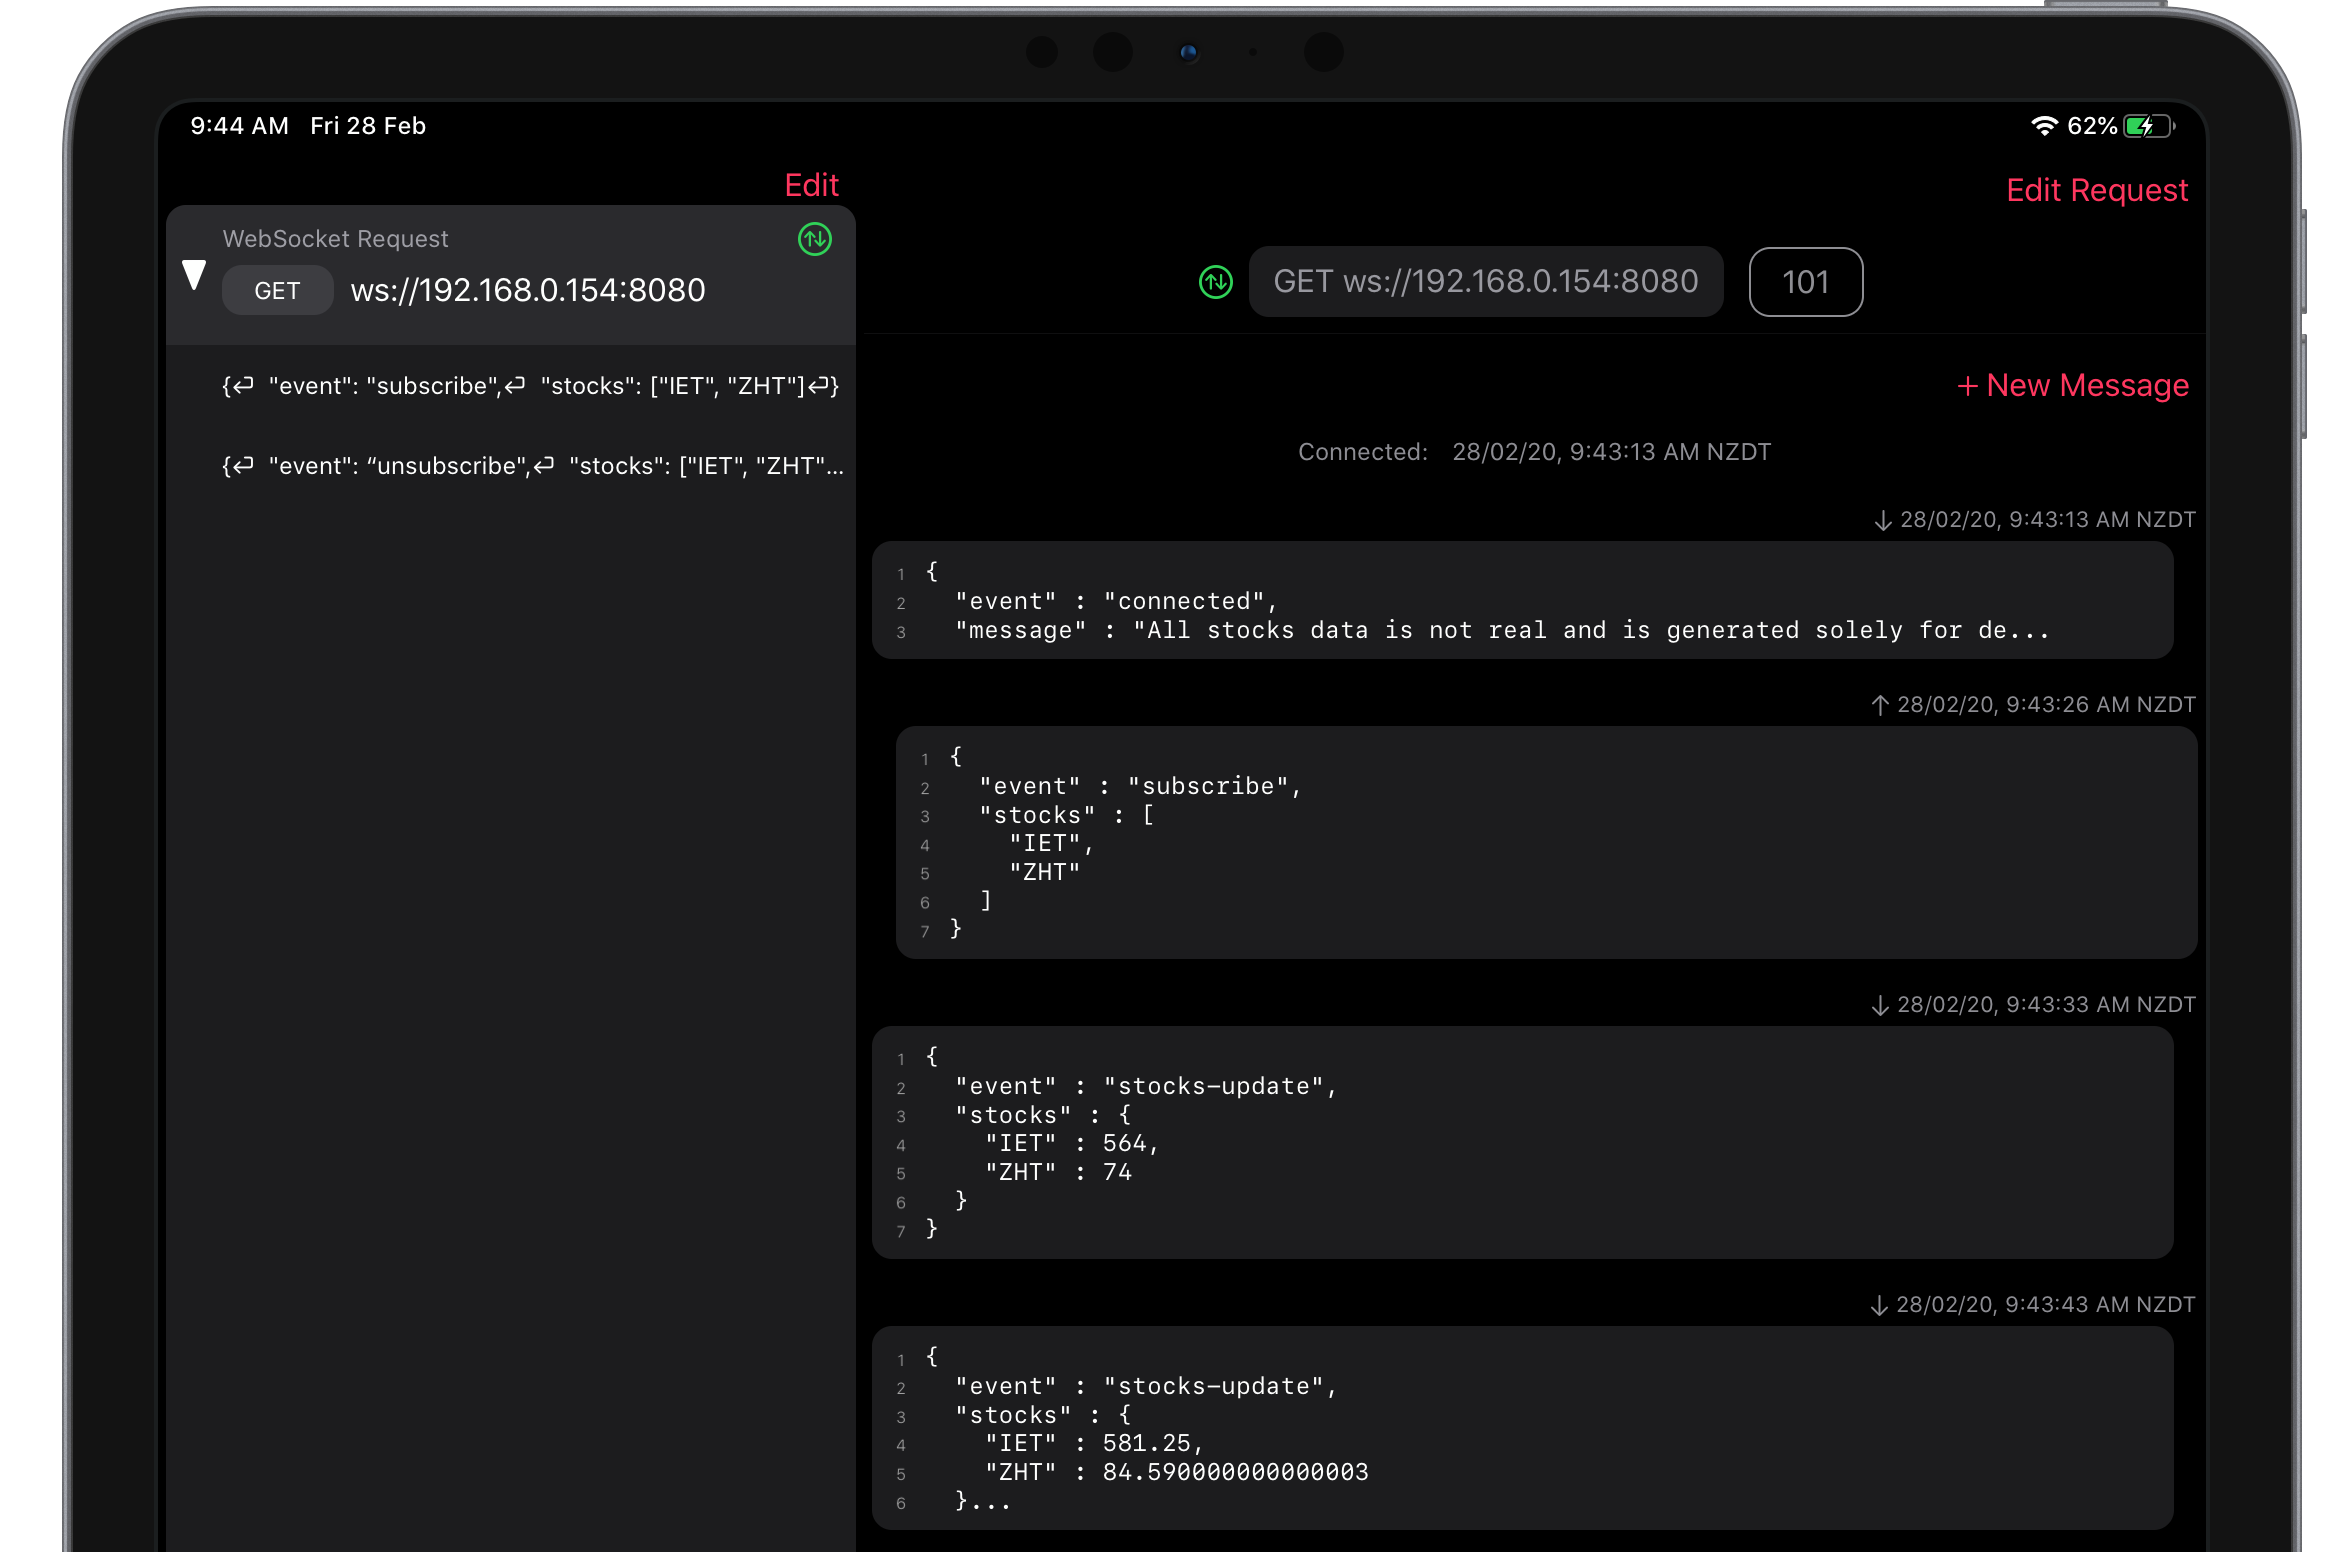
To unsubscribe from the updates, send an unsubscribe message.
{
  "event": "unsubscribe",
  "stocks": ["IET", "ZHT"]
}
# Monitoring connection status
To make sure that we don't keep an inactive connection open for too long our server will send ping frames every 15 seconds. If the client doesn't respond with a pong frame, the connection will be closed on the next iteration of the interval.
ws.pingInterval = setInterval(() => {
    if (!connectionInfo.isActive) {
        disconnect(ws, "connection inactive")
    } else {
        connectionInfo.isActive = false
        ws.ping()
    }
}, 15000)

ws.on('pong', () => {
    connectionInfo.isActive = true
});

ws.on('close', () => {
    clearInterval(ws.pingInterval)
    clearInterval(ws.stocksInterval)
})
To prevent prolonged connections, we'll limit each session to 5 minutes.
ws.connectionTimeout = setTimeout(() => {
    disconnect(ws, "connection time exceeds 5 minutes")
}, 300000)

ws.on('close', () => {
    clearInterval(ws.pingInterval)
    clearInterval(ws.stocksInterval)
    clearTimeout(ws.connectionTimeout)
})
This completes our WebSocket demo server! You can now connect, subscribe to stock updates, and receive real-time data over WebSocket.