

Build a macOS menu bar utility in SwiftUI
SwiftUI’s MenuBarExtra scene provides a simple way to integrate menu bar functionality into macOS apps. It can complement a traditional app by offering quick access to frequently used features or serve as the foundation for a standalone menu bar utility.
In this post, I’ll walk through the process of building a menu bar–only app using MenuBarExtra. I recently developed EncodeDecode, a small tool for encoding and decoding strings with percent encoding (URL encoding), and I’ll share what I learned along the way.
# Create a menu bar app
Once we have created a macOS app project in Xcode, we can modify the app declaration by replacing the default WindowGroup with a MenuBarExtra scene. This scene can be initialized with just a title or both a title and an image. If an image is provided, only the image will be visible in the menu bar, otherwise, the title text will be displayed.
@main
struct MenuBarExampleApp: App {
    var body: some Scene {
        MenuBarExtra(
            "Menu Bar Example",
            systemImage: "characters.uppercase"
        ) {
            ContentView()
                .frame(width: 300, height: 180)
        }
        .menuBarExtraStyle(.window)
    }
}
By default, MenuBarExtra uses the menu style, which behaves like a standard dropdown menu. However, for a standalone app, we may want to use the window style instead, as it allows for greater flexibility in presenting content. The window can either resize dynamically based on its content or have a fixed frame set on the root view.
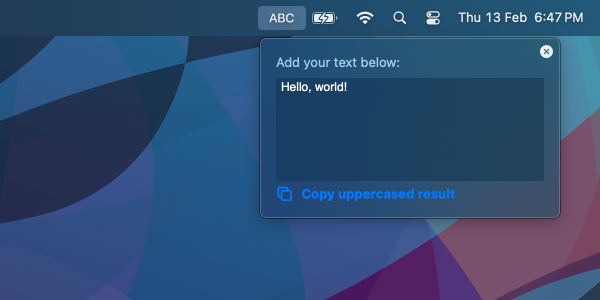
The ContentView serves as the root view of the utility, defining the app's interface within the window. For this example, we can create a simple app that allows users to paste a string, convert it to uppercase, and copy the result to the clipboard.
Here’s an example of how ContentView might look:
struct ContentView: View {
    @State private var textInput: String = ""

    var body: some View {
        VStack(alignment: .leading) {
            Text("Add your text below:")
                .foregroundStyle(.secondary)
            TextEditor(text: $textInput)
                .padding(.vertical, 4)
                .scrollContentBackground(.hidden)
                .background(.thinMaterial)
            Button(
                "Copy uppercased result",
                systemImage: "square.on.square"
            ) {
                let pasteboard = NSPasteboard.general
                pasteboard.clearContents()
                pasteboard.setString(
                    textInput.uppercased(),
                    forType: .string
                )
            }
            .buttonStyle(.plain)
            .foregroundStyle(.blue)
            .bold()
        }
        .padding()
    }
}

# Hide the app from the Dock and application switcher
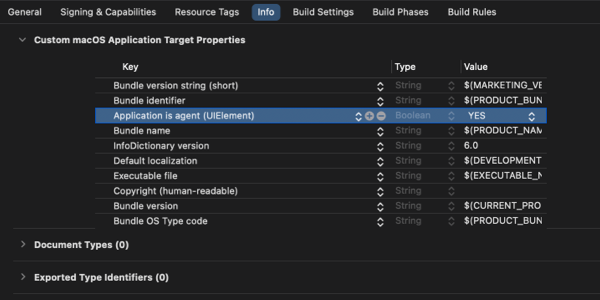
For apps that only appear in the menu bar, it's common to hide them from both the Dock and the application switcher. This can be achieved by setting the LSUIElement flag to true in the Info.plist file. This tells macOS that the app is an agent that runs in the background.


Level up your Swift skills!$35
100+ tips to take your Swift code to the next level
Swift Gems
- Advanced Swift techniques for experienced developers bypassing basic tutorials
- Curated, actionable tips ready for immediate integration into any Swift project
- Strategies to improve code quality, structure, and performance across all platforms
Level up your Swift skills!
100+ tips to take your Swift code to the next level
Swift Gems
# Providing a way to quit the app
After removing the app from the Dock and the app switcher, it’s important to provide a way for users to quit it, as they can no longer do so from the Dock. Unfortunately, SwiftUI doesn’t offer a built-in way to add a right-click menu to a menu bar item, so the simplest approach is to include a Quit button somewhere in the app’s interface.
For this example, we can place a small close button in the top-right corner of the window:
MenuBarExtra(
    "Menu Bar Example",
    systemImage: "characters.uppercase"
) {
    ContentView()
        .overlay(alignment: .topTrailing) {
            Button(
                "Quit",
                systemImage: "xmark.circle.fill"
            ) {
                NSApp.terminate(nil)
            }
            .labelStyle(.iconOnly)
            .buttonStyle(.plain)
            .padding(6)
        }
        .frame(width: 300, height: 180)
}
# Use a custom icon for the menu bar item
Before releasing the app, replacing the system symbol with a custom icon can make the menu item easier to recognize. A simplified version of the app icon, similar to the one used in the App Store, helps users associate the menu bar button with the app they downloaded.
To use a custom image, we need a different MenuBarExtra initializer that takes a label instead of a text and system image. If the image asset is already sized correctly for the menu bar button, we can load it directly, as shown in the example below.
MenuBarExtra {
    ContentView()
        .overlay(alignment: .topTrailing) {
            ...
        }
        .frame(width: 300, height: 180)
} label: {
    Label(
        "Menu Bar Example",
        image: .menuBarIcon
    )
}
However, when using a PNG that was larger than needed, I ran into sizing issues when creating a SwiftUI image directly. A workaround that worked for me was to first load the image as an NSImage, adjust its size, and then convert it to a SwiftUI Image.
MenuBarExtra {
    ContentView()
        .overlay(alignment: .topTrailing) {
            ...
        }
        .frame(width: 300, height: 180)
} label: {
    Label {
        Text("Menu Bar Example")
    } icon: {
        let image: NSImage = {
            let ratio = $0.size.height / $0.size.width
            $0.size.height = 18
            $0.size.width = 18 / ratio
            return $0
        }(NSImage(named: "MenuBarIcon")!)

        Image(nsImage: image)
    }
}
To take your macOS app further, consider integrating it with system features, such as adding a launch-at-login option or providing system-wide services. You can check out my other blog posts for instructions on how to do that: Add launch at login setting to a macOS app and Provide macOS system-wide services from your app.
If you are looking to build a strong foundation in SwiftUI, my book SwiftUI Fundamentals takes a deep dive into the framework's core principles and APIs to help you understand how it works under the hood and how to use it effectively in your projects. And my new book The SwiftUI Way helps you adopt recommended patterns, avoid common pitfalls, and use SwiftUI's native tools appropriately to work with the framework rather than against it.
For more resources on Swift and SwiftUI, check out my other books and book bundles.

Work with SwiftUI. Not against it.$35
A field guide to SwiftUI patterns and anti-patterns
The SwiftUI Way
- Avoid common SwiftUI pitfalls
- Build deeper intuition for the framework
- Gain insights from a former SwiftUI Engineer at Apple
Work with SwiftUI. Not against it.
A field guide to SwiftUI patterns and anti-patterns
The SwiftUI Way