

Core Spotlight integration for Spotlight and internal app search
We can increase the visibility of our app’s content by making it available to the system so it appears in Spotlight search results on the device. This can be done by indexing the content with Core Spotlight APIs. The same index can also be used to power search inside the app, allowing us to avoid writing custom search logic.
In this post, I’ll walk through how we can leverage Core Spotlight for both system-wide and in-app search. Core Spotlight indexing APIs have been available since iOS 9, but they’ve evolved over the years. I’ll show the approach I’ve found to work best with the latest updates.
# Expose app data in Spotlight search
# Adding data to Spotlight index
There are several ways to integrate app data with Spotlight, including CSSearchableItem, NSUserActivity, and IndexedEntity. I’ve been using CSSearchableItem because it’s a simple, lightweight solution that also allows linking data to NSUserActivity via relatedUniqueIdentifier, or to IndexedEntity with associateAppEntity(_:priority:) when we need the additional functionality they provide.
We can start indexing data as soon as it’s available in the app, for example after a network call retrieves it, after the user creates an item, or on app launch if the data is bundled with the app. In our simple example, the data is hardcoded, so we can index it immediately. The recent Core Spotlight APIs provide async versions, which allows us to place the indexing logic inside the SwiftUI task() modifier.
import SwiftUI
import CoreSpotlight

@main
struct CoreSpotlightExampleApp: App {
    var body: some Scene {
        WindowGroup {
            SmoothiesView()
                .task {
                    await indexAppContent()
                }
        }
    }

    private func indexAppContent() async {
        // index app content
    }
}
The first step in indexing content is to create CSSearchableItem instances. For each item, we define an attribute set that specifies the properties to index and display in Spotlight search. We then create the searchable item with this attribute set and a unique identifier.
private func indexAppContent() async {
    let items = RecipeProvider.shared.recipes.map { recipe in
        let attributeSet = CSSearchableItemAttributeSet(
            contentType: .content
        )
        attributeSet.title = recipe.title
        attributeSet.thumbnailData = recipe.imageData

        return CSSearchableItem(
            uniqueIdentifier: recipe.id,
            domainIdentifier: nil,
            attributeSet: attributeSet
        )
    }

    ...
}
Once the searchable items are prepared, the next step is to define a CSSearchableIndex. This index can be created using the shared default instance or by initializing a custom index with a specific name. Using a custom index provides additional control, such as specifying a protection class and performing batch updates, which we will cover later. In this example, we create a named custom index and call indexSearchableItems() to add the items to it.
private func indexAppContent() async {
    ...

    let index = CSSearchableIndex(name: "SpotlightSearchExample")

    do {
        try await index.indexSearchableItems(items)
    } catch {
        print("Error indexing content: \(error.localizedDescription)")
    }
}
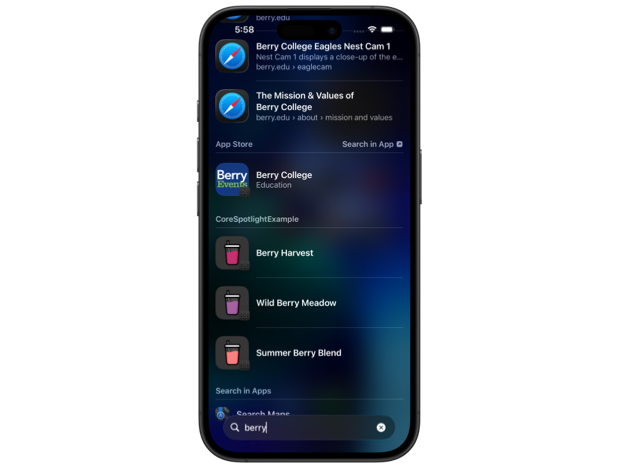
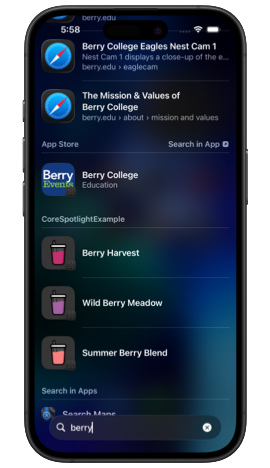
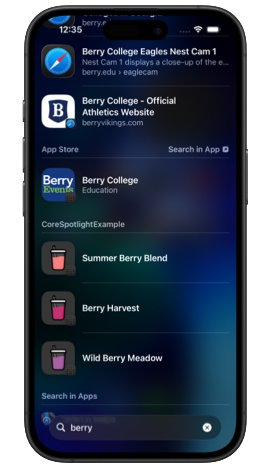
After completing this setup and running the app, we can open Spotlight search and look for a term that matches our content. My example project contains smoothie recipes, so when I search for a term like "berry", I will see matching berry smoothie entries.
# Deep linking from Spotlight results
By default, when the user taps a search result in Spotlight, the system launches the app on its initial page. We can improve this experience by taking them directly to the detail page of the selected item.
When the app is opened from a Spotlight result, we can use the onContinueUserActivity() modifier in SwiftUI to retrieve the tapped item’s identifier and navigate to it. The activity type is CSSearchableItemActionType, and the identifier is available under the CSSearchableItemActivityIdentifier key in the activity’s userInfo dictionary.
NavigationStack(path: $navigationPath) {
    ...
}
.onContinueUserActivity(
    CSSearchableItemActionType
) { activity in
    if let uniqueIdentifier = activity.userInfo?[
        CSSearchableItemActivityIdentifier
    ] as? String {
        navigateToRecipe(withID: uniqueIdentifier)
    }
}
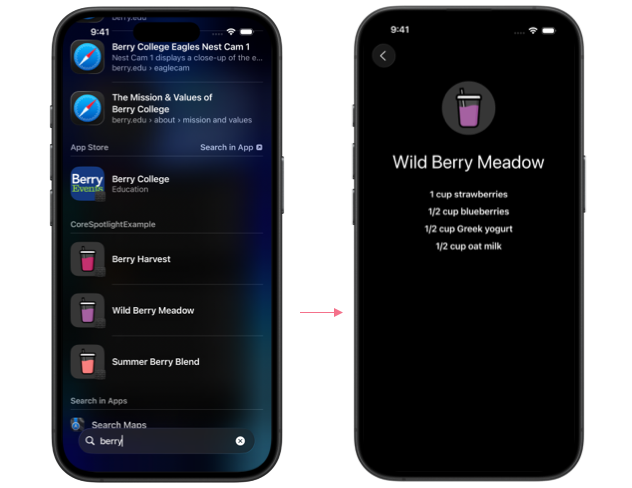
Here’s an example of deep linking from a Spotlight search result directly to an item in the app.
# Avoiding unnecessary re-indexing
With this navigation in place, we can turn our attention back to indexing. There are a few improvements we can make to the basic setup to make it smarter and more efficient. Firstly, we can utilize the batch update APIs, which also allow us to attach some custom metadata to the updates called client state. By reading and writing the client state, we can ensure that we only index content when necessary, avoiding re-indexing the same items every time the app starts.
The client state type that Core Spotlight accepts is Data, so it can contain anything we need to include. For my example, I defined a simple Codable struct with a date.
struct SearchIndexData: Codable {
    let date: Date
}
We can update our previous indexing logic to check if client data already exists, and depending on that, proceed with indexing or skip it. When indexing is required, we should create a new index data instance, perform the indexing within a batch update, then end the update and attach the new data. This ensures that the next time the app starts, fetching client data returns the value we stored. Since there is no way to add client data without using batch updates, this API is still useful even when the content is small enough not to require batching.
private func indexAppContent() async {
    ...

    let index = CSSearchableIndex(name: "SpotlightSearchExample")

    if
        let clientState = try? await index.fetchLastClientState(),
        let indexData = try? JSONDecoder().decode(
            SearchIndexData.self, from: clientState
        )
    {
        print("Search index exists, created on: \(indexData.date)")
    } else if
        let newData = try? JSONEncoder().encode(
            SearchIndexData(date: Date())
        )
    {
        do {
            index.beginBatch()
            try await index.indexSearchableItems(items)
            try await index.endBatch(withClientState: newData)
        } catch {
            print("Error indexing content: \(error.localizedDescription)")
        }
    }
}
# Customizing result ranking
Another improvement we can make is to inform Core Spotlight when the user interacts with indexed content in the app. This helps Spotlight prioritize search results, making it more likely that items the user engages with frequently will appear first.
We can achieve this by setting the lastUsedDate in the attribute set for the CSSearchableItem, which requires re-indexing the last used item. Depending on the application flow, we can choose the most suitable place to perform this re-indexing. In my example, I’ll do it in the onAppear() modifier of the recipe detail view.
struct RecipeView: View {
    let recipe: Recipe

    var body: some View {
        ScrollView {
            ...
        }
        .onAppear {
            let attributeSet = CSSearchableItemAttributeSet(
                contentType: .content
            )
            attributeSet.title = recipe.title
            attributeSet.thumbnailData = recipe.imageData
            attributeSet.lastUsedDate = Date()

            let item = CSSearchableItem(
                uniqueIdentifier: recipe.id,
                domainIdentifier: nil,
                attributeSet: attributeSet
            )

            item.isUpdate = true
            let index = CSSearchableIndex(
                name: "SpotlightSearchExample"
            )
            index.indexSearchableItems([item])
        }
    }
}
Note that we should set isUpdate property on the item to true in this case. This allows the system to update an existing item with the same identifier instead of deleting and reinserting it, which is more efficient.
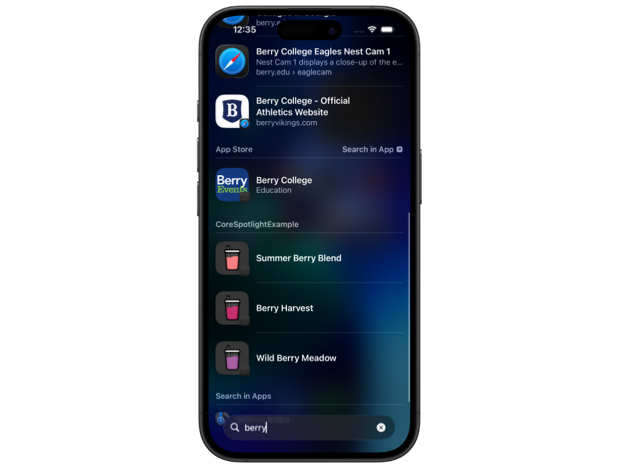
To test whether this prioritization works in practice, we can open the same item several times in the app and then search in Spotlight for a term that matches it along with a few other items. In my case, after interacting with the Summer Berry Blend smoothie a few times, it appears at the top of the Spotlight results for the app.
# Provide a reindexing app extension
Apple recommends providing a reindexing app extension to keep the index up to date even when the app isn’t running. This extension can be used to update the app’s index if it appears to be incomplete, corrupted or lost.
To add the extension, we need to create a new target using the CoreSpotlight Delegate template.
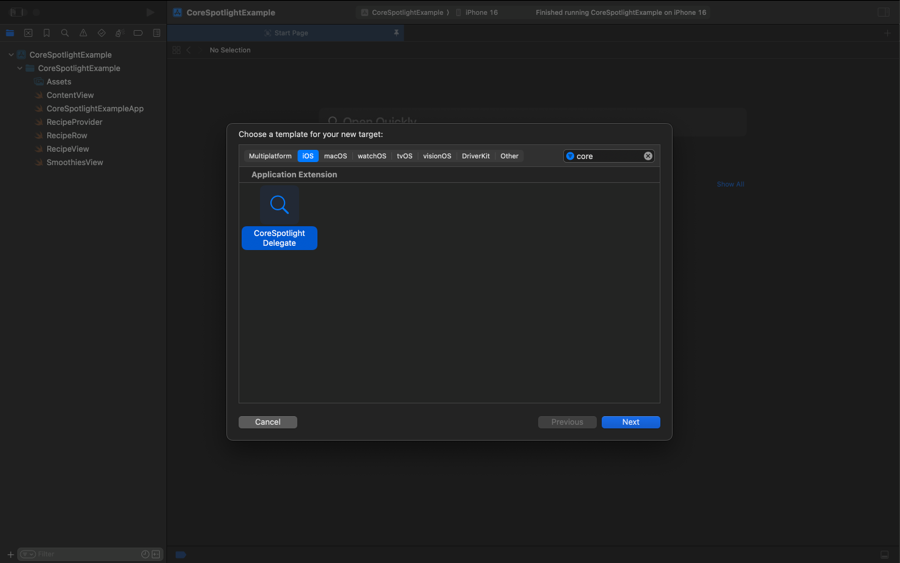
This extension requires implementing two methods: one for reindexing all searchable items and another for reindexing specific items by their identifiers. It’s important to call the acknowledgementHandler once indexing is completed.
class SearchReindexing: CSIndexExtensionRequestHandler {

    private func searchableItems(for recipes: [Recipe]) -> [CSSearchableItem] {
        recipes.map { recipe in
            let attributeSet = CSSearchableItemAttributeSet(
                contentType: .content
            )
            attributeSet.title = recipe.title
            attributeSet.thumbnailData = recipe.imageData

            return CSSearchableItem(
                uniqueIdentifier: recipe.id,
                domainIdentifier: nil,
                attributeSet: attributeSet
            )
        }
    }

    override func searchableIndex(
        _ searchableIndex: CSSearchableIndex,
        reindexAllSearchableItemsWithAcknowledgementHandler acknowledgementHandler: @escaping () -> Void
    ) {
        let items = searchableItems(for: RecipeProvider.shared.recipes)

        searchableIndex.indexSearchableItems(items) { error in
            // handle possible errors

            acknowledgementHandler()
        }
    }

    override func searchableIndex(
        _ searchableIndex: CSSearchableIndex,
        reindexSearchableItemsWithIdentifiers identifiers: [String],
        acknowledgementHandler: @escaping () -> Void
    ) {
        let items = searchableItems(
            for: RecipeProvider.shared.recipes
                .filter { identifiers.contains($0.id) }
        )

        searchableIndex.indexSearchableItems(items) { error in
            // handle possible errors

            acknowledgementHandler()
        }
    }

    ...
}
To reindex your data inside the extension, make sure the files where it’s stored are included in both the main app target and the extension target.


Level up your Swift skills!$35
100+ tips to take your Swift code to the next level
Swift Gems
- Advanced Swift techniques for experienced developers bypassing basic tutorials
- Curated, actionable tips ready for immediate integration into any Swift project
- Strategies to improve code quality, structure, and performance across all platforms
Level up your Swift skills!
100+ tips to take your Swift code to the next level
Swift Gems
# Power in-app search with Core Spotlight
Exposing our app data in Spotlight search is an effective way to increase its visibility outside the app, but the Core Spotlight index can also provide value within the app itself. We can leverage this index to power in-app search without building and maintaining separate search logic.
I’m going to show how we can integrate Core Spotlight search capability, continuing from my SwiftUI sample project. To let users perform searches inside the app, I’ll add a searchable() modifier to the SmoothiesView.
import SwiftUI
import CoreSpotlight

struct SmoothiesView: View {
    ...

    @State private var searchText = ""

    var body: some View {
        NavigationStack(path: $navigationPath) {
            ...
        }
        .searchable(text: $searchText)
    }
}
# Querying Core Spotlight index inside the app
To query Core Spotlight for search results, we first need to prepare Spotlight by calling the prepare() class method on CSUserQuery. This only needs to be called once per app lifecycle and should be done only when necessary, for example, when the view with the search interface first appears.
NavigationStack(path: $navigationPath) {
    ...
}
.searchable(text: $searchText)
.onAppear {
    CSUserQuery.prepare()
}
The Core Spotlight APIs for querying search results have async versions, so we can call them within a task() modifier. It’s recommended to wait at least 0.3 seconds after the user’s input to allow them to finish typing and avoid unnecessary search queries, which can be expensive. We can then initialize a Core Spotlight query by passing the search text to the userQueryString parameter, and read the results as they arrive by iterating over the responses async sequence. This sequence can return an enum with two cases: a search result or a search suggestion. However, I’ve never seen it return any suggestions in practice. It’s possible this functionality is incomplete, or that it depends on factors I’m not aware of.
NavigationStack(path: $navigationPath) {
    ...
}
.searchable(text: $searchText)
.onAppear {
    CSUserQuery.prepare()
}
.task(id: searchText) {
    guard !searchText.isEmpty else { return }

    do {
        try await Task.sleep(for: .seconds(0.3))

        let query = CSUserQuery(
            userQueryString: searchText,
            userQueryContext: nil
        )

        for try await element in query.responses {
            switch(element) {
            case .item(let item):
                print("Got a result: \(item.item.uniqueIdentifier)")
            case .suggestion(let suggestion):
                let str = suggestion
                    .suggestion.localizedAttributedSuggestion
                print("Got a suggestion: \(str)")
            @unknown default: break
            }
        }
    } catch {
        // handle possible errors
        return
    }
}
When constructing a search query, it’s important to use the correct initializer: init(userQueryString:userQueryContext:), not init(queryString:queryContext:). Using the latter results in an invalid query error (CSSearchQueryErrorDomain/-2002), but it’s easy to select it by accident when using Xcode autocomplete, so I thought it was worth mentioning.
# Displaying search results
Depending on the desired search experience in our app, we can either display a dedicated search interface while a search is in progress or filter the content in place. I’ll filter the list of smoothies as the user types a search query. To do this, I’ll assemble all the search results into an array and then transform this array of query items into recipe objects. If you are doing the same, don’t forget to reset the results when a new query starts.
struct SmoothiesView: View {
    @State private var navigationPath: [Recipe] = []

    private let recipes = RecipeProvider.shared.recipes

    @State private var searchText = ""
    @State private var filteredRecipes: [Recipe] = []
    @State private var queryItems: [CSUserQuery.Item] = []

    var recipesToDisplay: [Recipe] {
        searchText.isEmpty ? recipes : filteredRecipes
    }

    var body: some View {
        NavigationStack(path: $navigationPath) {
            List(recipesToDisplay) { recipe in
               ...
            }
        }
        ...

        .task(id: searchText) {
            ...

            do {
                ...

                queryItems = []

                for try await element in query.responses {
                    switch(element) {
                    case .item(let item):
                        queryItems.append(item)
                    case .suggestion(let suggestion):
                        ...
                    @unknown default: break
                    }
                }
            } catch {
                // handle possible errors
                return
            }

            filteredRecipes = queryItems.compactMap { item in
                recipes.first(
                    where: { $0.id == item.item.uniqueIdentifier }
                )
            }
        }
    }
}
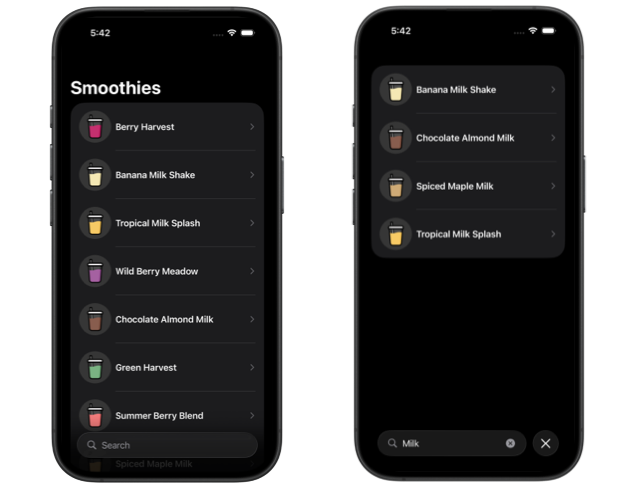
Now, when the search text is not empty, the list of smoothies will consist of the recipes that match the search.
# Personalizing results based on engagement
Similar to how we informed Spotlight about the items the user engages with for improved result ranking in the "Customizing result ranking" section for Spotlight search, we can also personalize the results in internal app search, although the APIs to do this are a bit different. First, we need to detect when the user engages with a search result and call the userEngaged() method on the query instance. This method requires the engaged item as a CSUserQuery.Item and the currently visible items as an array of the same type.
struct SmoothiesView: View {
    @State private var navigationPath: [Recipe] = []

    @State private var searchText = ""
    @State private var queryItems: [CSUserQuery.Item] = []

    ...

    var body: some View {
        NavigationStack(path: $navigationPath) {
            ...
        }

        ...
        .onChange(of: navigationPath) { oldValue, newValue in
            guard
                !searchText.isEmpty,
                let selection = newValue.first,
                let item = queryItems.first(
                    where: {
                        $0.item.uniqueIdentifier == selection.id
                    }
                )
            else { return }

            let query = CSUserQuery(
                userQueryString: searchText,
                userQueryContext: nil
            )

            query.userEngaged(
                item, visibleItems: queryItems,
                interaction: .select
            )
        }
    }
}
We also need to enable ranked results for the Core Spotlight query used to power the search, and sort the results based on rank before preparing them for display. Even though the documentation claims that enableRankedResults is true by default, I found that without defining the query context, the ranking won't work.
struct SmoothiesView: View {
    ...

    @State private var queryItems: [CSUserQuery.Item] = []

    ...

    var body: some View {
        NavigationStack(path: $navigationPath) {
            ...
        }
        .task(id: searchText) {
            ...

            do {
                ...

                let context = CSUserQueryContext()
                context.enableRankedResults = true

                let query = CSUserQuery(
                    userQueryString: searchText,
                    userQueryContext: context
                )

                ...

            } catch {
                // handle possible errors
                return
            }

            queryItems.sort { first, second in
                first.item.compare(
                    byRank: second.item
                ) == .orderedAscending
            }

            filteredRecipes = queryItems.compactMap { item in
                recipes.first(
                    where: {
                        $0.id == item.item.uniqueIdentifier
                    }
                )
            }
        }
    }
}
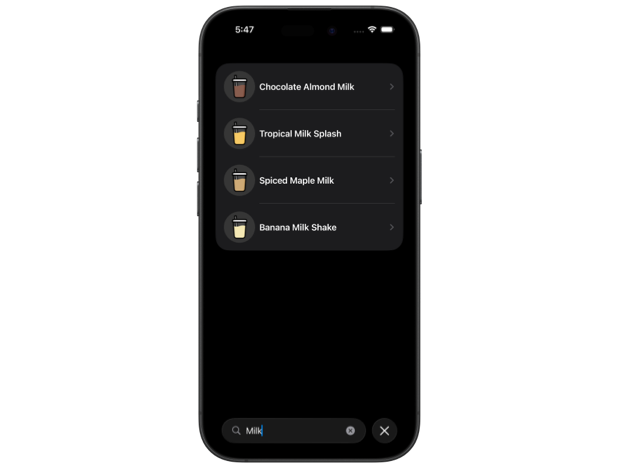
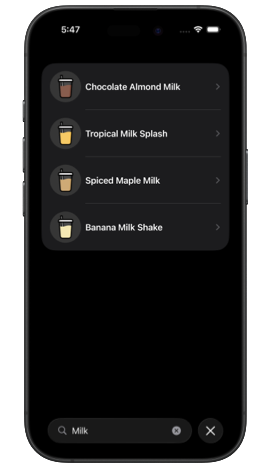
Now, if I search for "milk" in my sample smoothie app and interact with the "Chocolate Almond Milk" result, the next time it appears in search it will be moved to the top of the list.
As we’ve seen, Core Spotlight provides powerful APIs for exposing our app’s data on the user’s device, even when the app isn’t running, and for driving search functionality inside the app. It’s not perfect, and some promised features like search suggestions and semantic search announced by Apple last year don’t appear to be working properly, but it’s still a useful framework to understand and integrate.
If you’d like to try it out yourself, you can download the sample code I used to demo the examples in this post from our GitHub repository. Note that I created the project using Xcode 26 beta 5.
If you’re looking for more Swift and SwiftUI reading, take a look at my books and book bundles. They offer detailed guides and practical tips to deepen your understanding of both the Swift language and the SwiftUI framework.
Deepen your understanding of SwiftUI!$35
The essential guide to SwiftUI core concepts and APIs
SwiftUI Fundamentals
- Explore the key APIs and design patterns that form the foundation of SwiftUI
- Develop a deep, practical understanding of how SwiftUI works under the hood
- Learn from a former Apple engineer who worked on widely used SwiftUI APIs
Deepen your understanding of SwiftUI!
The essential guide to SwiftUI core concepts and APIs
SwiftUI Fundamentals