Exporting and importing localizations in a SwiftUI app
Xcode provides a convenient tool for exporting localizable strings from a project. It can automatically find such strings in our code and generate xcloc files that can then be sent to translators. When the translations are done, all we need to do is to import them back into the project, and Xcode will automatically create Localizable.strings files. In this post we are going to see how to use the export localizations tool provided by Xcode in a SwiftUI app.
# Localizable strings in SwiftUI
There are two main ways to define localizable strings in a SwiftUI application: using the Text view initializer that accepts a LocalizedStringKey and using String.init(localized:) API from the Foundation framework.
When we create a Text view from a string literal it gets implicitly converted into a LocalizedStringKey under the hood. This doesn't happen when we create a Text view from a string variable.
Text("Hello") // localizable string

let string = "Hello"
Text(string) // non-localizable string
The export localizations tool will pick up the localizable strings directly from Text views within our project.
We can also provide a comment together with the string to give more context to translators. The comments will be exported alongside the strings.
Text("Welcome to the app!", comment: "A welcome message displayed after login")
Many built-in SwiftUI components accept a LocalizedStringKey as a shorthand for passing a text label. They are also picked up and exported by the tool.
Button("Log in") { // localizable string
    // perform login
}
To add a comment in this case we have to fall back to the extended version of the component initializer and provide a Text view instead.
Button {
    // perform login
} label: {
    Text("Log in", comment: "A button to perform login")
}
If we don't want to define localizable strings inside the UI code directly, we can use the Foundation API for creating strings: String.init(localized:). It's a modern replacement for NSLocalizedString. When defining a localizable string with String.init(localized:) we can also provide a comment alongside it. Both the string and the comment will be picked up by the export localizations tool.
let welcomeMessage = String(
    localized: "Welcome to the app!",
    comment: "A welcome message displayed after login"
)
When we need to use a localized string in the UI, we can simply pass the string variable to a Text view.
let welcomeMessage = String(
    localized: "Welcome to the app!",
    comment: "A welcome message displayed after login"
)

struct ContentView: View {
    var body: some View {
        Text(welcomeMessage)
    }
}
# Exporting localizations from the project
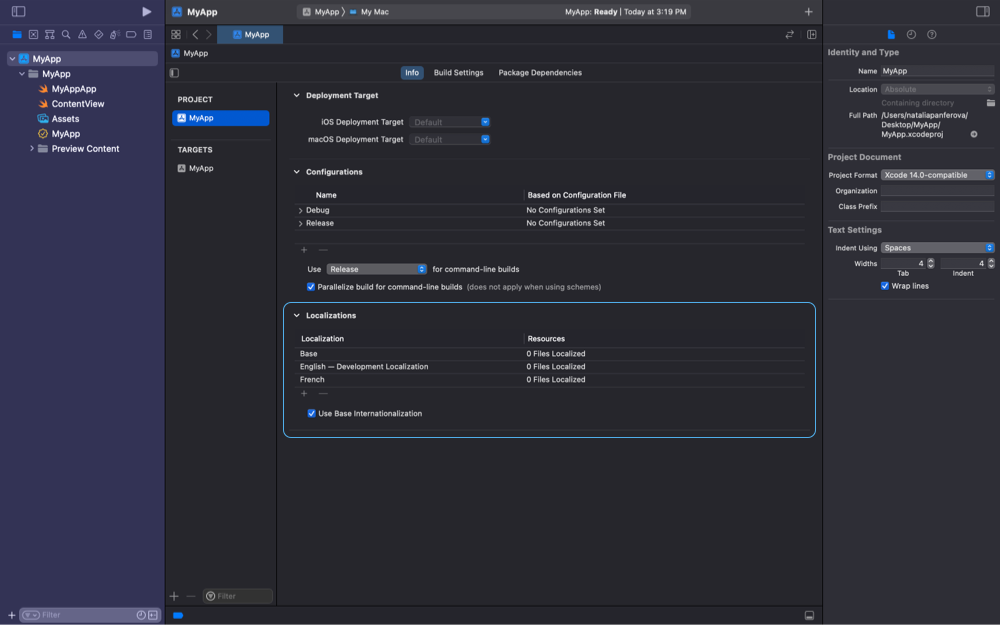
Once we are ready to start preparing our localizable strings for translation, we need to define the list of languages our app will support. We do that in the project settings in Xcode. For example, I decided to just support English and French at first, so I added French to the list of localizations in the Info tab of the settings.

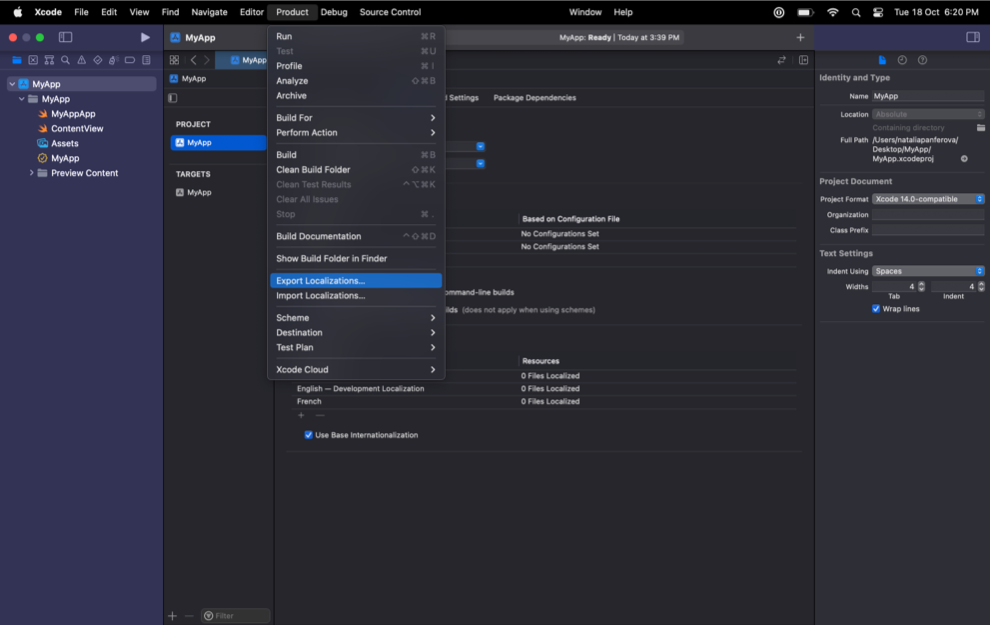
Now we can export localizable strings from Product > Export Localizations... and choose where to save the files.

The export localizations tool will create a folder in our chosen location where it will put all of the localizable strings from our project. Each language will get its own xcloc file. Since my example only supports English and French, I only got two files in the folder: en.xcloc and fr.xcloc. To inspect the contents of those files we can simply double-click on them to open them in Xcode.
Let's say that my project had the following code written in SwiftUI.
let welcomeMessage = String(
    localized: "Welcome to the app!",
    comment: "A welcome message displayed after login"
)

struct ContentView: View {
    @State private var isAuthenticated = false

    var body: some View {
        if isAuthenticated {
            Text(welcomeMessage)
        } else {
            Text("Hello")
            Button {
                isAuthenticated = true
            } label: {
                Text("Log in", comment: "A button to perform login")
            }
        }
    }
}
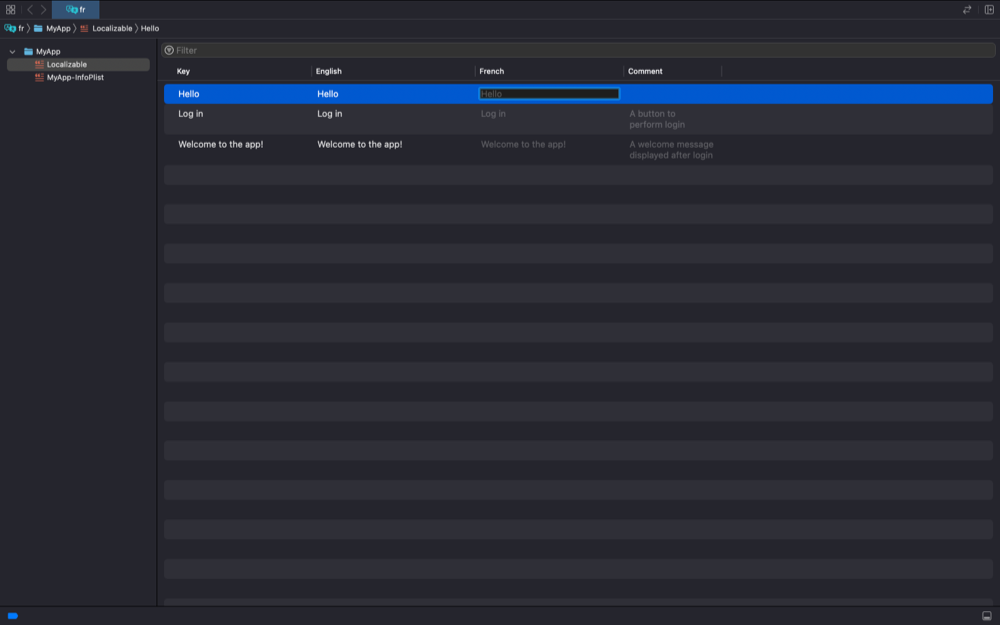
Here is what my fr.xcloc file looks like. The string Hello got exported but it doesn't have a comment, because I didn't provide one to the Text view that displays the string. The Log in string has an associated comment that I passed to the text label of the button. The Welcome to the app! string is exported from the String.init(localized:comment:) that I used to create a localized string assigned to the welcomeMessage variable.

The French column of the file is editable. We can send this file to a translator and they will be able to add the french strings in that column.
# Importing localizations
When the translations are done, we can import the completed xcloc files back into our Xcode project.
To import the french translations I can go to Product > Import Localizations..., find the fr.xcloc file and click the Import button. Xcode will generate the Localizable.strings file from the french translations automatically and add it to the project.
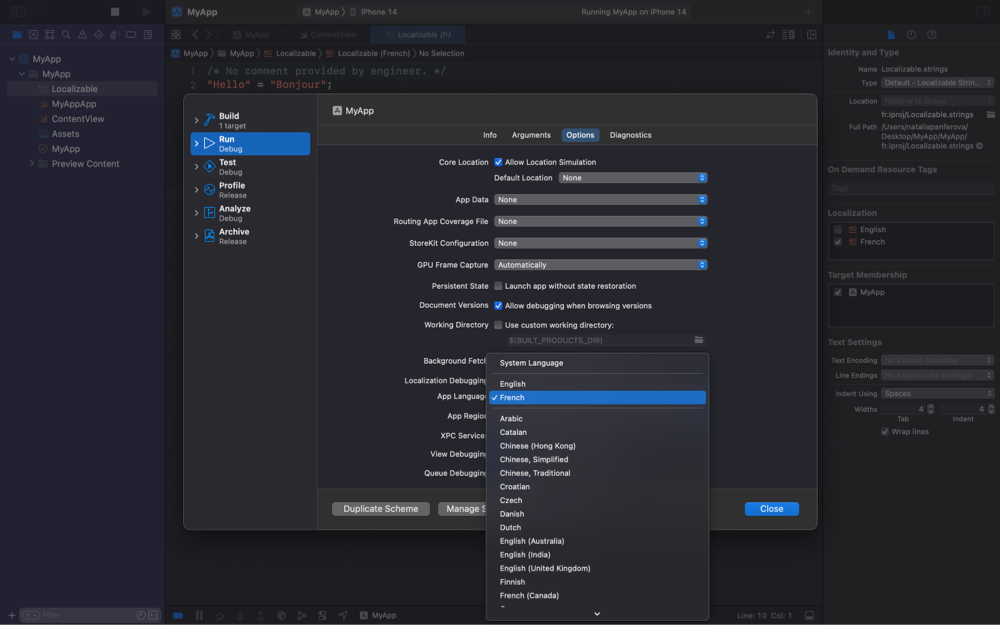
All that's left to do is to test the app in French to see if everything is working as expected. To easily test a language without changing the simulator or the device settings we can edit the app language in the scheme. To do that we can click on the application scheme in the top bar and choose the Edit Scheme... option. Then in the Options tab of the Run scheme change the App Language to the one we want to test. Xcode conveniently places the languages that we support in the app at the top of the list.

When we run the app now, we should be able to see the translated strings.


