

Using @Observable in SwiftUI views
With the release of iOS 17 last year, Apple introduced the Observation framework, providing a Swift-specific implementation of the observer design pattern. This framework allows us to use the @Observable macro in SwiftUI as a way to provide observable data to our views.
Switching from the older ObservableObject to the new @Observable macro can be a good choice. This new approach lets us use familiar tools like State and Environment, instead of their object-based equivalents, making our code simpler and easier to work with. It can also help improve performance by only updating views when the properties they rely on change.
As iOS 18 approaches and we might consider dropping support for versions below iOS 17 soon, I thought that now is a great time to explore how we can use Observation in our SwiftUI projects.
# Declare and initialize an Observable
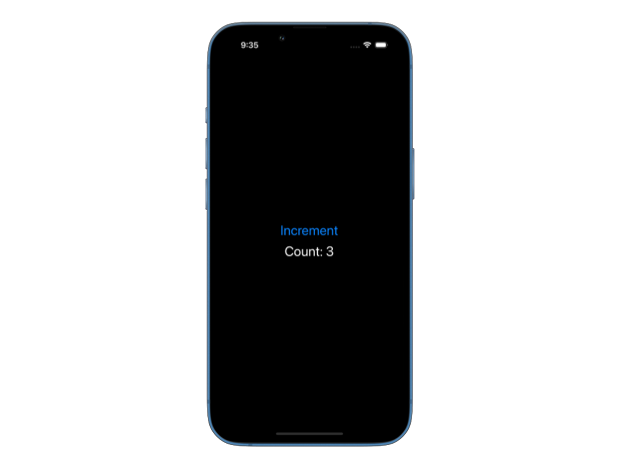
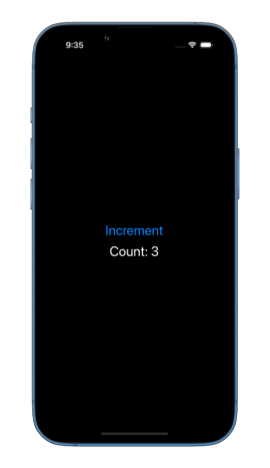
To start using @Observable, we apply the macro to a class. This allows SwiftUI to observe changes in the class's properties and update the UI accordingly. Here's a simple example:
import SwiftUI
import Observation

@Observable
class DataModel {
    var count = 0
}

struct ContentView: View {
    @State private var dataModel = DataModel()

    var body: some View {
        VStack(spacing: 10) {
            Button("Increment") {
                dataModel.count += 1
            }
            Text("Count: \(dataModel.count)")
        }
        .padding()
    }
}
In this example, the count property updates whenever the button is pressed, and the text view immediately reflects the new count. This approach makes it easy to keep our UI in sync with our data.
# Share an Observable between a parent and a child view
If we have a more complex view hierarchy, we can define our observable data higher up and pass it down through the views. This allows different parts of the app to share the same data model without needing to manually synchronize changes.
struct ContentView: View {
    @State private var dataModel = DataModel()

    var body: some View {
        VStack(spacing: 10) {
            IncrementButton(dataModel: dataModel)
            Text("Count: \(dataModel.count)")
        }
        .padding()
    }
}

struct IncrementButton: View {
    var dataModel: DataModel

    var body: some View {
        Button("Increment") {
            dataModel.count += 1
        }
    }
}
# Pass an Observable through the environment
We can also initialize our data model at the top level of the app and make it available to all child views using the environment() modifier. This way, we can easily access our data model by its type anywhere in the app.
import SwiftUI
import Observation

@main
struct MyApp: App {
    @State private var dataModel = DataModel()

    var body: some Scene {
        WindowGroup {
            ContentView()
                .environment(dataModel)
        }
    }
}

struct ContentView: View {
    @Environment(DataModel.self) private var dataModel

    var body: some View {
        VStack(spacing: 10) {
            IncrementButton()
            Text("Count: \(dataModel.count)")
        }
        .padding()
    }
}

struct IncrementButton: View {
    @Environment(DataModel.self) private var dataModel

    var body: some View {
        Button("Increment") {
            dataModel.count += 1
        }
    }
}
Enhance older apps with SwiftUI!$40
A detailed guide on gradually adopting SwiftUI in UIKit projects
Updated for iOS 26 and Xcode 26!
Integrating SwiftUI into UIKit Apps
- Upgrade your apps with new features like Swift Charts and Widgets
- Support older iOS versions with effective backward-compatible strategies
- Seamlessly bridge state and data between UIKit and SwiftUI using the latest APIs
Enhance older apps with SwiftUI!
A detailed guide on gradually adopting SwiftUI in UIKit projects
Integrating SwiftUI
into UIKit Apps
Updated for iOS 26 and Xcode 26!
# Create bindings to properties of an Observable
To create bindings to the mutable properties of an observable class, we need to mark it as bindable using the @Bindable property wrapper. This allows us to create bindings directly from the observable properties, which can then be passed down to child views.
struct ContentView: View {
    @Environment(DataModel.self) private var dataModel

    var body: some View {
        @Bindable var dataModel = dataModel

        VStack(spacing: 10) {
            IncrementButton(count: $dataModel.count)
            Text("Count: \(dataModel.count)")
        }
        .padding()
    }
}

struct IncrementButton: View {
    @Binding var count: Int

    var body: some View {
        Button("Increment") {
            count += 1
        }
    }
}
Note that in this example, it's important to place the @Bindable declaration at the top of the body. Placing it inside the VStack will cause a linker error Undefined symbol: unsafeMutableAddressor of self #1 : Observable.ContentView in Observable.ContentView.body.getter : some.
# @Observable vs ObservableObject
One of the biggest advantages of the new @Observable compared to the old ObservableObject is that views depending on it will only be re-rendered when the properties they read in their body change.
Here is an example of an @Observable with two mutable properties, count1 and count2:
import SwiftUI
import Observation

@Observable
class DataModel {
    var count1 = 0
    var count2 = 0
}

@main
struct MyApp: App {
    @State private var dataModel = DataModel()

    var body: some Scene {
        WindowGroup {
            ContentView()
                .environment(dataModel)
        }
    }
}

struct ContentView: View {
    var body: some View {
        VStack(spacing: 40) {
            Count1()
            Count2()
        }
        .padding()
    }
}

struct Count1: View {
    @Environment(DataModel.self) private var dataModel

    var body: some View {
        let _ = Self._printChanges()
        @Bindable var dataModel = dataModel
        VStack(spacing: 10) {
            IncrementButton(count: $dataModel.count1)
            Text("Count 1: \(dataModel.count1)")
        }
    }
}

struct Count2: View {
    @Environment(DataModel.self) private var dataModel

    var body: some View {
        let _ = Self._printChanges()
        @Bindable var dataModel = dataModel
        VStack(spacing: 10) {
            IncrementButton(count: $dataModel.count2)
            Text("Count 2: \(dataModel.count2)")
        }
    }
}

struct IncrementButton: View {
    @Binding var count: Int

    var body: some View {
        Button("Increment") {
            count += 1
        }
    }
}
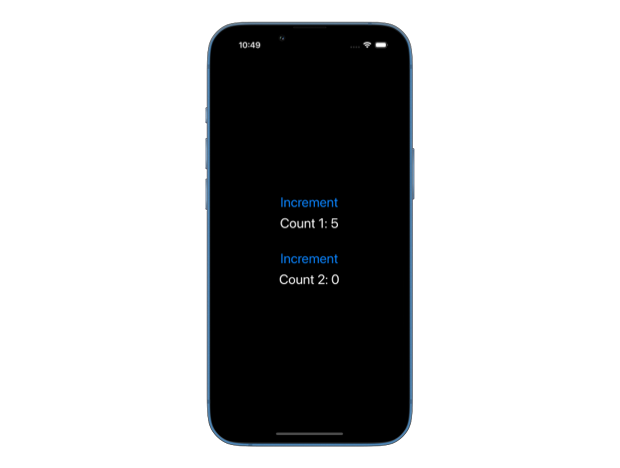
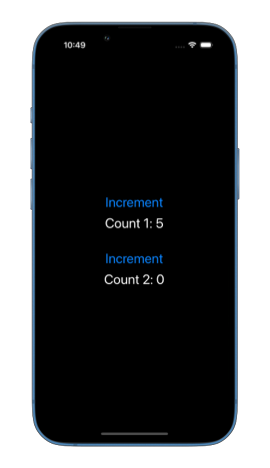
If we have two different views to display the two count values, and each of the views only reads one value in the body, the view body will only be recalled when that particular count value changes. We put Self._printChanges() here for debugging purposes to see which view body is called. If we run the app and only increment the first count, we will only see Count1: @dependencies changed. printed in the Xcode console each time we increment it. The body of the Count2 view will not be called.
Comparing this to using ObservableObject with @Published properties:
import SwiftUI

class DataModel: ObservableObject {
    @Published var count1 = 0
    @Published var count2 = 0
}

@main
struct MyApp: App {
    @StateObject private var dataModel = DataModel()

    var body: some Scene {
        WindowGroup {
            ContentView()
                .environmentObject(dataModel)
        }
    }
}

struct ContentView: View {
    var body: some View {
        VStack(spacing: 40) {
            Count1()
            Count2()
        }
        .padding()
    }
}

struct Count1: View {
    @EnvironmentObject private var dataModel: DataModel

    var body: some View {
        let _ = Self._printChanges()
        VStack(spacing: 10) {
            IncrementButton(count: $dataModel.count1)
            Text("Count 1: \(dataModel.count1)")
        }
    }
}

struct Count2: View {
    @EnvironmentObject private var dataModel: DataModel

    var body: some View {
        let _ = Self._printChanges()
        VStack(spacing: 10) {
            IncrementButton(count: $dataModel.count2)
            Text("Count 2: \(dataModel.count2)")
        }
    }
}

struct IncrementButton: View {
    @Binding var count: Int

    var body: some View {
        Button("Increment") {
            count += 1
        }
    }
}
If we run this version of the app, we'll see both Count2: _dataModel changed. and Count1: _dataModel changed. printed in the console every time we increment a count. That's because with ObservableObject, if a view reads even one published property, it will be re-rendered when any published property changes. This often led to unnecessary re-renders in the past when using ObservableObject, causing views to update for no reason. With the new @Observable, we don't have this risk.
If you want to build a strong foundation in SwiftUI, my new book SwiftUI Fundamentals takes a deep dive into the framework’s core principles and APIs to help you understand how it works under the hood and how to use it effectively in your projects.
For more resources on Swift and SwiftUI, check out my other books and book bundles.
Deepen your understanding of SwiftUI!$35
The essential guide to SwiftUI core concepts and APIs
SwiftUI Fundamentals
- Explore the key APIs and design patterns that form the foundation of SwiftUI
- Develop a deep, practical understanding of how SwiftUI works under the hood
- Learn from a former Apple engineer who worked on widely used SwiftUI APIs
Deepen your understanding of SwiftUI!
The essential guide to SwiftUI core concepts and APIs
SwiftUI Fundamentals