

Rendering quadratic Bézier curves with Metal
When developing our app Exsto, we needed to add GPU rendering to the app. As the curves are drawn by users with their fingers or pencil, the strokes end up with many hundreds, if not thousands, of points with multiple self-intersecting sections. What we settled on is by no means the most optimal method, nor have we implemented it in the most optimal way. However, we do believe it is one of the simplest solutions we have come across while researching the topic.
The method we present is a partial implementation of the algorithm in Kokojima et al. 2006 paper. The reason it is not a full implementation of Kokojima's solution is that we have not adopted their more optimal multi-sampling method and have rather followed a simpler, more costly, brute-force approach, as the performance difference on Apple GPUs is likely minimal.
Since these curves can (and commonly do) have many self-intersecting loops with a mixture of convex and concave curve sections, most solutions end up with a complex pre-processing stage that builds a detailed (non-overlapping) geometry. Kokojima et al. trades off this complexity for extra GPU rendering cost.
The Kokojima et al. method consists of three distinct steps. The initial two steps are dedicated to setting up a stencil buffer, while the final step is responsible for shading the stenciled area.
# Rendering your first curve
This method can only be used to render a CGPath that is made of moveToPoint, addQuadCurveToPoint and addLineToPoint CGPathElements.
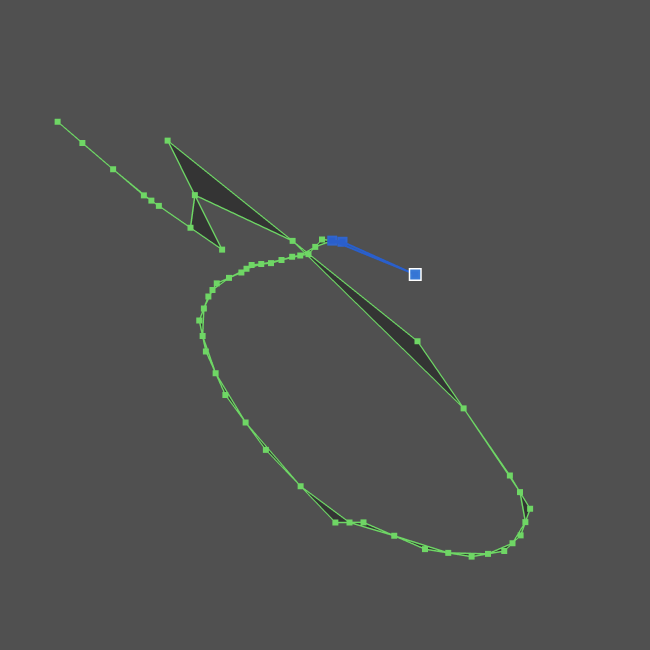
For this post we will be re-creating the steps needed to render this curve.

The curve has multiple self-intersecting segments and is a good example of the types of curves created in our app Exsto.
# The triangle fan
The first step requires creating a triangle fan about a pivot including all of the points on the curve (but not the control points). We can use any pivot point, so for simplicity, we use the first point of the curve.

This is rendered into the stencil buffer using the invert operation. The stencil starts out with a value of 0, so only areas with an odd number of overlapping triangles end up set within the stencil.
// Invert for back facing primitives
depthStencilDescriptor.frontFaceStencil.depthStencilPassOperation = .invert
depthStencilDescriptor.backFaceStencil.depthStencilPassOperation = .invert

// Do not skip any primitives
depthStencilDescriptor.backFaceStencil.stencilCompareFunction = .always
depthStencilDescriptor.frontFaceStencil.stencilCompareFunction = .always
depthStencilDescriptor.frontFaceStencil.readMask = 0
depthStencilDescriptor.backFaceStencil.readMask = 0
We do not need to render any color values, so we do not attach a fragment function.

Notice how the upper left region of the stencil map has a chunk cut away. Looking back at the triangles in the geometry image, you can see the overlapping section that resulted in an even number of inversions on the stencil.
# Convex and concave curves
We render the curves by collecting all curve segments, including the control point, and creating a sequence of triangles with the control point as the second point in each triangle.
We apply a fragment shader to discard pixels outside the quadratic curve. Here we further update the stencil using the same invert function. The fragment function does not set any color values, so it has a void return type.
For maximum GPU compatibility, we use UV coordinates set in the vertex stage. Metal interpolates these for each pixel of the fragment shader. To set these coordinates within your vertex function, set the start point on each triangle as [0, 0], the control point as [0.5, 0], and the final point on the curve as [1, 1].
vertex CurvedVertexOut curveVertexFunction(
    uint vertexId [[vertex_id]],
    uint vertexOffset [[base_vertex]],
    constant simd_float2 *vertices [[buffer(0)]],
    constant MTLSceneState *sceneStatePointer [[buffer(1)]]

) {
    CurvedVertexOut out;
    float2 pixelSpacePosition = vertices[vertexId].xy;
    MTLSceneState sceneState = MTLSceneState(*sceneStatePointer);

    out.position = position(pixelSpacePosition, sceneState);

    // Compute UV values for interpolation
    uint adjustedIndex = vertexId - vertexOffset;
    uint vertexNumber = adjustedIndex % 3;
    out.uv.x = half(vertexNumber) * 0.5h;
    out.uv.y = floor(out.uv.x);
    return out;
}
Within GPU shaders, it is of course important to minimize logic branches as much as possible. In our shader, we are indexing the points from a shared buffer using a vertexOffset. As each triangle has 3 vertices, taking the adjusted index modulo 3 will number the vertices for each triangle {0, 1, 2}. The first value in our UV vector can be computed by multiplying the vertex number by 0.5. To compute the second value, we round the first value down to the closest integer, resulting in our {0, 0}, {0.5, 0}, {1, 1} set of values without any branching.
fragment void curveFragment(CurvedVertexOut in [[ stage_in ]])
{
    float threshold = (in.uv.x * in.uv.x) - in.uv.y;
    if (threshold >= 0.0h) {
        discard_fragment();
    }
    return;
}
Here we are using the interpolated UV within the fragment shader to compute the quadratic u^2 - v for each pixel of each triangle. Only the non-discarded pixels invert the stencil. For a convex curve, this sets the stencil value. For a concave curve, where the triangle fan would have already set the stencil, this inverts the value back to 0.

# Shading the path
With the stencil buffer now set, we render the two triangles that form the bounding box of the path, only rendering where the stencil is active. Additionally, we reset the stencil to 0 to prepare for the next path.
// Reset the stencil for any location drawn
depthStencilDescriptor.frontFaceStencil.depthStencilPassOperation = .zero
depthStencilDescriptor.backFaceStencil.depthStencilPassOperation = .zero

// Only pixels within the stencil
descriptor.backFaceStencil.stencilCompareFunction = .equal
descriptor.frontFaceStencil.stencilCompareFunction = .equal
To ensure that the GPU performs the stencil test before evaluating the final shading shader, we can prefix the fragment function with [[early_fragment_tests]].
# Multi sampling
For smooth edges, we use the native multi-sampling provided by Metal on Apple GPUs. This approach is simpler than the more complex solution proposed by Kokojima et al.
For the triangle fan the GPU automatically interpolates the edges of the triangles. For curves, we need to ensure that the fragment function is evaluated for each multi-sampled point. To achieve this, we set the UV coordinates that are being interpolated as [[sample_no_perspective]], implicitly forcing the fragment function to be run once for each sample rather than ones per pixel.
struct CurvedVertexOut
{
    float4 position [[position]];
    half2 uv [[sample_no_perspective]];
};
In the future, we plan on looking into using the fragment function return [[sample_mask]] value so that the quadratic is only evaluated once per pixel rather than once per sample, using the proximity to 0 as the indicator of the number of intersected samples.


Level up your Swift skills!$35
100+ tips to take your Swift code to the next level
Swift Gems
- Advanced Swift techniques for experienced developers bypassing basic tutorials
- Curated, actionable tips ready for immediate integration into any Swift project
- Strategies to improve code quality, structure, and performance across all platforms
Level up your Swift skills!
100+ tips to take your Swift code to the next level
Swift Gems